Hello Excalibur
Introduction
Excalibur uses a theater-style metaphor to organize your games. There are Actor's which can move around and do things in the currently active Scene. All of that lives in the Engine container.
Global Namespace vs. Imports
Imports
In this tutorial, we are using "ES Style" imports, but the global ex. namespace can also be used if you are using a standalone script tag.
ts
ts
Script Tag
If you are using a standalone script, the excalibur types will have a ex. in front of them.
Excalibur can be used as a script reference, see standalone script for more info.
html
html
ts
ts
Hello Excalibur: Building Breakout!
In this example we'll build a simple version of the popular game Breakout. Breakout is a game where you break bricks at the top of the screen using a ball that bounces off a player paddle. You must break all the bricks to win and avoid the ball falling off the bottom of the screen.
The whole code example in this guide is on GitHub if you want to skip to the code.
This example creates the game in a single file for simplicity, we recommend splitting your game into separate files to keep your project more manageable.
Basic Engine Start
Create a script in your project, for example, game.ts. Excalibur games are built with the Engine container.
It is important to call game.start() once you are done configuring your game otherwise it won't start!
typescript
typescript
tsgame = newEngine ({width : 800,height : 600,});
tsgame = newEngine ({width : 800,height : 600,});
tsgame .start ();
tsgame .start ();
Open a browser and view the blank blue screen of goodness.
Creating the paddle with an Actor
Game elements that have a position and are drawn to the screen are called an [Actor][/docs/actor]. Actors are the primary way to draw things to the screen.
Think of actors like you would the actors in a play. If you change scenes different actors might be on stage.
Actors must be added to a scene to be drawn or updated! game.add(actor) will add an actor to the current scene.
Below we are going to create the paddle Actor for our Breakout game. Actors can be given many parameters such as position, width, and height.
tspaddle = newActor ({x : 150,y :game .drawHeight - 40,width : 200,height : 20,// Let's give it some color with one of the predefined// color constantscolor :Color .Chartreuse ,});// Make sure the paddle can participate in collisions, by default excalibur actors do not collide with each other// CollisionType.Fixed is like an object with infinite mass, and cannot be moved, but does participate in collision.paddle .body .collisionType =CollisionType .Fixed ;// `game.add` is the same as calling// `game.currentScene.add`game .add (paddle );
tspaddle = newActor ({x : 150,y :game .drawHeight - 40,width : 200,height : 20,// Let's give it some color with one of the predefined// color constantscolor :Color .Chartreuse ,});// Make sure the paddle can participate in collisions, by default excalibur actors do not collide with each other// CollisionType.Fixed is like an object with infinite mass, and cannot be moved, but does participate in collision.paddle .body .collisionType =CollisionType .Fixed ;// `game.add` is the same as calling// `game.currentScene.add`game .add (paddle );
Open up your favorite browser and you should see something like this:

That’s neat, but this game is way more fun if things move around. Let’s make the paddle follow the mouse around in the x direction. The paddle will be centered on the mouse cursor.
tsgame .input .pointers .primary .on ("move", (evt ) => {paddle .pos .x =evt .worldPos .x ;});
tsgame .input .pointers .primary .on ("move", (evt ) => {paddle .pos .x =evt .worldPos .x ;});
Important! Actors have a default anchor of (0.5, 0.5) which means their graphics are positioned in their center (not top-left).
Creating the ball with Actors
What’s Breakout without the ball? Excalibur comes pre-built with a physics collision system to help you out with things like balls bouncing off other objects.
To make the ball, we switch the collider to a circle with the useCircleCollider(radius) helper.
In this case we want to handle the resolution ourselves to emulate the the way Breakout works. We use the ex.CollisionType.Passive which will send an event that there has been an intersection but will not resolve the positions.
Read more about the different CollisionTypes that Excalibur supports.
tsball = newActor ({x : 100,y : 300,// Use a circle collider with radius 10radius : 10,// Set the colorcolor :Color .Red ,});// Start the serve after a secondconstballSpeed =vec (100, 100);setTimeout (() => {// Set the velocity in pixels per secondball .vel =ballSpeed ;}, 1000);// Set the collision Type to passive// This means "tell me when I collide with an emitted event, but don't let excalibur do anything automatically"ball .body .collisionType =CollisionType .Passive ;// Other possible collision types:// "ex.CollisionType.PreventCollision - this means do not participate in any collision notification at all"// "ex.CollisionType.Active - this means participate and let excalibur resolve the positions/velocities of actors after collision"// "ex.CollisionType.Fixed - this means participate, but this object is unmovable"// Add the ball to the current scenegame .add (ball );
tsball = newActor ({x : 100,y : 300,// Use a circle collider with radius 10radius : 10,// Set the colorcolor :Color .Red ,});// Start the serve after a secondconstballSpeed =vec (100, 100);setTimeout (() => {// Set the velocity in pixels per secondball .vel =ballSpeed ;}, 1000);// Set the collision Type to passive// This means "tell me when I collide with an emitted event, but don't let excalibur do anything automatically"ball .body .collisionType =CollisionType .Passive ;// Other possible collision types:// "ex.CollisionType.PreventCollision - this means do not participate in any collision notification at all"// "ex.CollisionType.Active - this means participate and let excalibur resolve the positions/velocities of actors after collision"// "ex.CollisionType.Fixed - this means participate, but this object is unmovable"// Add the ball to the current scenegame .add (ball );
The ball is now setup to move at 100 pixels per second down and right. Next we will make the ball bounce off the side of the screen. Let’s take advantage of the postupdate event.
tsball .on ("postupdate", () => {// If the ball collides with the left side// of the screen reverse the x velocityif (ball .pos .x <ball .width / 2) {ball .vel .x =ballSpeed .x ;}// If the ball collides with the right side// of the screen reverse the x velocityif (ball .pos .x +ball .width / 2 >game .drawWidth ) {ball .vel .x =ballSpeed .x * -1;}// If the ball collides with the top// of the screen reverse the y velocityif (ball .pos .y <ball .height / 2) {ball .vel .y =ballSpeed .y ;}});
tsball .on ("postupdate", () => {// If the ball collides with the left side// of the screen reverse the x velocityif (ball .pos .x <ball .width / 2) {ball .vel .x =ballSpeed .x ;}// If the ball collides with the right side// of the screen reverse the x velocityif (ball .pos .x +ball .width / 2 >game .drawWidth ) {ball .vel .x =ballSpeed .x * -1;}// If the ball collides with the top// of the screen reverse the y velocityif (ball .pos .y <ball .height / 2) {ball .vel .y =ballSpeed .y ;}});
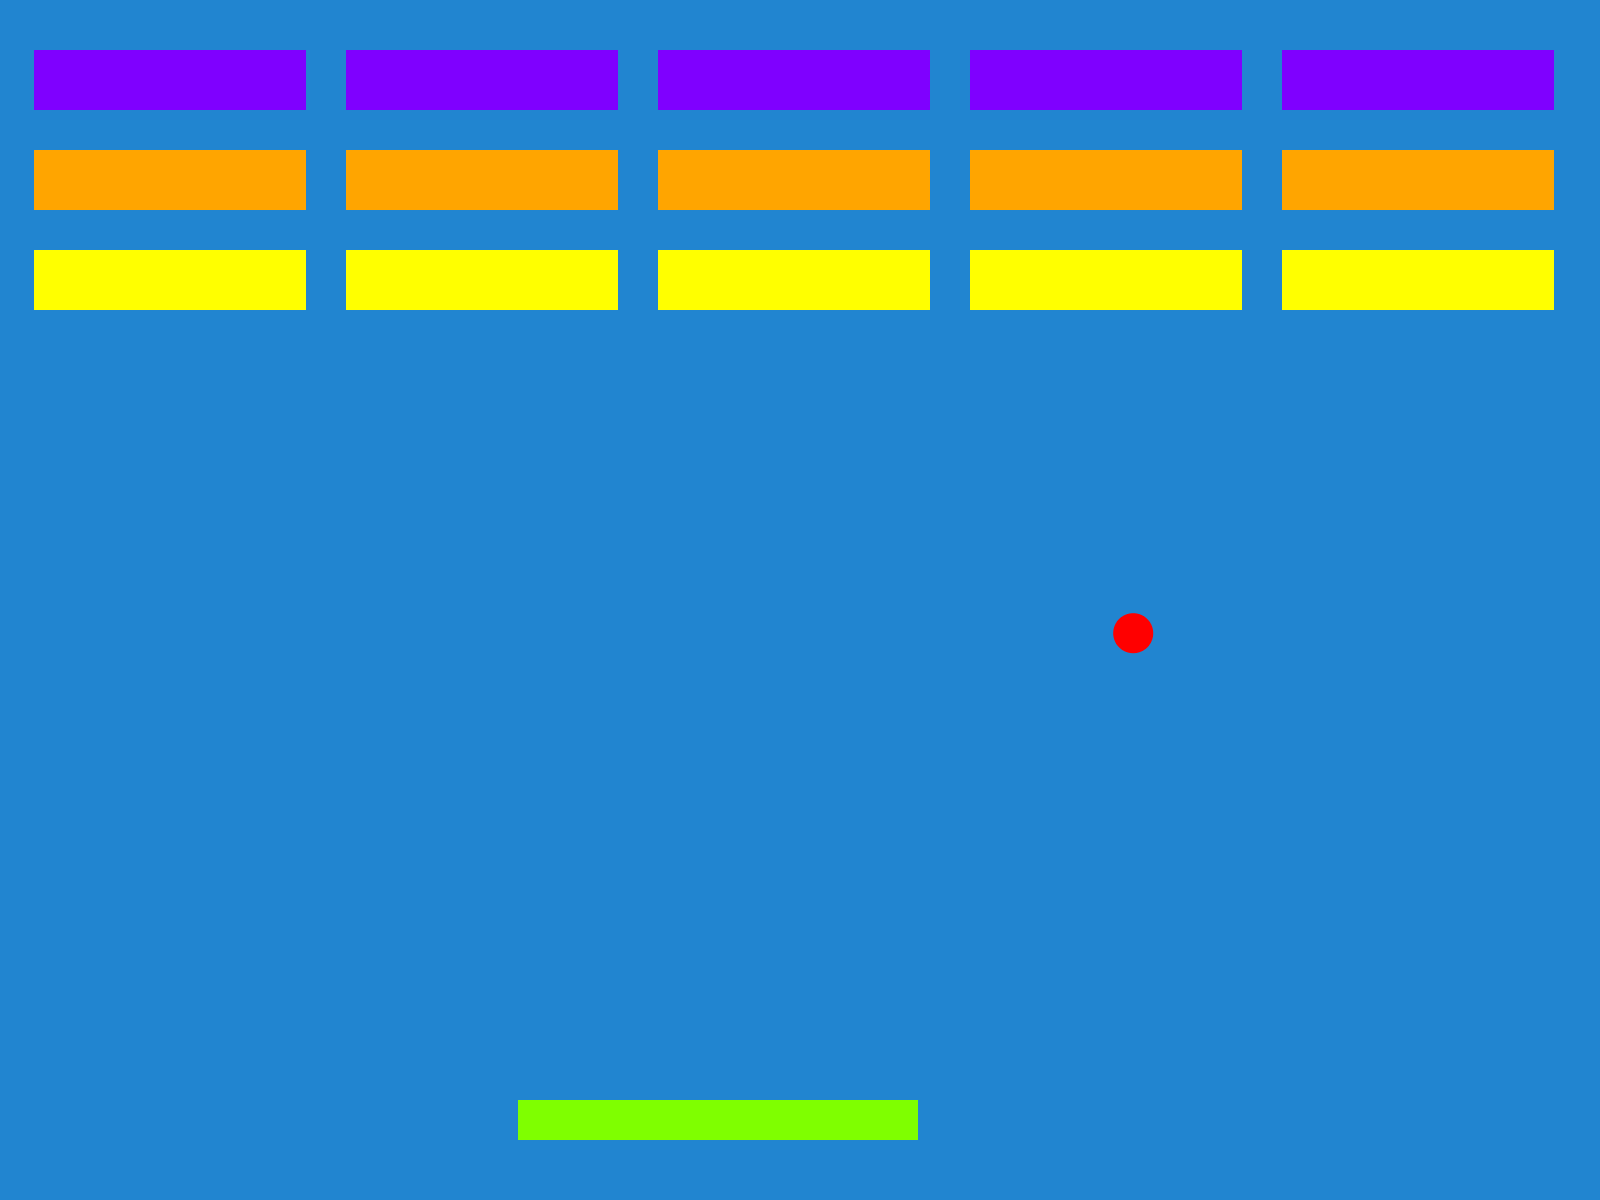
Creating the bricks with Actors
Breakout needs some bricks to break. To do this we calculate our brick layout and add them to the current scene.
tspadding = 20; // pxconstxoffset = 65; // x-offsetconstyoffset = 20; // y-offsetconstcolumns = 5;constrows = 3;constbrickColor = [Color .Violet ,Color .Orange ,Color .Yellow ];// Individual brick width with padding factored inconstbrickWidth =game .drawWidth /columns -padding -padding /columns ; // pxconstbrickHeight = 30; // pxconstbricks :Actor [] = [];for (letj = 0;j <rows ;j ++) {for (leti = 0;i <columns ;i ++) {bricks .push (newActor ({x :xoffset +i * (brickWidth +padding ) +padding ,y :yoffset +j * (brickHeight +padding ) +padding ,width :brickWidth ,height :brickHeight ,color :brickColor [j %brickColor .length ],}));}}bricks .forEach (function (brick ) {// Make sure that bricks can participate in collisionsbrick .body .collisionType =CollisionType .Active ;// Add the brick to the current scene to be drawngame .add (brick );});
tspadding = 20; // pxconstxoffset = 65; // x-offsetconstyoffset = 20; // y-offsetconstcolumns = 5;constrows = 3;constbrickColor = [Color .Violet ,Color .Orange ,Color .Yellow ];// Individual brick width with padding factored inconstbrickWidth =game .drawWidth /columns -padding -padding /columns ; // pxconstbrickHeight = 30; // pxconstbricks :Actor [] = [];for (letj = 0;j <rows ;j ++) {for (leti = 0;i <columns ;i ++) {bricks .push (newActor ({x :xoffset +i * (brickWidth +padding ) +padding ,y :yoffset +j * (brickHeight +padding ) +padding ,width :brickWidth ,height :brickHeight ,color :brickColor [j %brickColor .length ],}));}}bricks .forEach (function (brick ) {// Make sure that bricks can participate in collisionsbrick .body .collisionType =CollisionType .Active ;// Add the brick to the current scene to be drawngame .add (brick );});
When the ball collides with bricks, we want to remove them from the scene. We use the collisionstart handler to accomplish this. This handler fires when objects first touch, if you want to know every time resolution is completed use postcollision.
tscolliding = false;ball .on ("collisionstart", function (ev ) {if (bricks .indexOf (ev .other ) > -1) {// kill removes an actor from the current scene// therefore it will no longer be drawn or updatedev .other .kill ();}// reverse course after any collision// intersections are the direction body A has to move to not be clipping body B// `ev.content.mtv` "minimum translation vector" is a vector `normalize()` will make the length of it 1// `negate()` flips the direction of the vectorvarintersection =ev .contact .mtv .normalize ();// Only reverse direction when the collision starts// Object could be colliding for multiple framesif (!colliding ) {colliding = true;// The largest component of intersection is our axis to flipif (Math .abs (intersection .x ) >Math .abs (intersection .y )) {ball .vel .x *= -1;} else {ball .vel .y *= -1;}}});ball .on ("collisionend", () => {// ball has separated from whatever object it was colliding withcolliding = false;});
tscolliding = false;ball .on ("collisionstart", function (ev ) {if (bricks .indexOf (ev .other ) > -1) {// kill removes an actor from the current scene// therefore it will no longer be drawn or updatedev .other .kill ();}// reverse course after any collision// intersections are the direction body A has to move to not be clipping body B// `ev.content.mtv` "minimum translation vector" is a vector `normalize()` will make the length of it 1// `negate()` flips the direction of the vectorvarintersection =ev .contact .mtv .normalize ();// Only reverse direction when the collision starts// Object could be colliding for multiple framesif (!colliding ) {colliding = true;// The largest component of intersection is our axis to flipif (Math .abs (intersection .x ) >Math .abs (intersection .y )) {ball .vel .x *= -1;} else {ball .vel .y *= -1;}}});ball .on ("collisionend", () => {// ball has separated from whatever object it was colliding withcolliding = false;});
Finally, if the ball leaves the screen by getting past the paddle, the player loses!
tsball .on ("exitviewport", () => {alert ("You lose!");});
tsball .on ("exitviewport", () => {alert ("You lose!");});
Congratulations! You have just created your first game in Excalibur! You can download this example here.
Some things you could do on your own to take this sample further
- Add sprite graphics to the paddle, ball, and bricks
- Add a fun background instead of the blue
- Interpolate the paddle position between move events for a smoother look
- Make the ball ricochet differently depending where the paddle hits it
It's time to get introduced to the Engine for more examples. Once you're ready, you can browse the API Reference.