The Excalibur team has built a number of games over the years. During our last few game jams, we started paper prototyping soon after our brainstorming process. It’s been working great and we highly recommend giving it a try!
Changing rules or mechanics that only exist on paper is a lot faster than having to adjust any code you may have written for those changes. It’s possible to alter your game without much worry, because you’re operating primarily in the realm of imagination, rather than within the constraints of your software development environment.
Paper prototyping can also help avoid the “sunk-cost fallacy”, which encourages you to stick with whatever you’ve spent a lot of time on just because you’ve spent a lot of time on it. Instead, you can change as much or as little as you wish without having to worry about deleting a bunch of code that you’ve already written.
You also have the opportunity to fix game design problems before you've devoted time to implementing them in the actual software. While we were paper prototyping Sweep Stacks, we uncovered a game design complication with how the board filled up over time. Without having to write any code, we were able to determine a solution for the issue and implement it directly when we started programming the game.
If you’ve spent time prototyping, you'll have a more concrete idea of what you want your game to be. When you actually start writing code, you can begin with a more specific idea of what you want to accomplish. We’ve found it’s much easier to visualize and architect our code when we have a clear idea of how the rules and systems of a game will work together.
While it's called “paper prototyping”, this process doesn't literally have to be done with paper, or any physical components at all. Virtual paper prototyping can be just as effective, and allows you to collaborate more easily with remote teammates. There are plenty of wireframing and “virtual tabletop” web apps out there that you can use to put together a digital prototype for your game (we usually use Excalidraw).
The next time you’re working on a game, try doing some prototyping before you write any code. Adjust your rules, modify your designs, and dream of what you want to build.
Updated to the latest Excalibur, Capacitor.js & Parcel!
In this post we put a web canvas game built in Excalibur into an Android (or iOS) app with Capacitor.js!
In the past I would have used something like Cordova, but this new thing from the folks at Ionic has TypeScript support out of the box for their native APIs and support for using any Cordova plugins you might miss.
The capacitor project setup is pretty straightforward from their docs, it can drop in place in an existing project or create a brand new project from scratch.
I opted for the brand new project:
> npm init @capacitor/app
> npm init @capacitor/app
Then follow their wizard and instructions to configure.
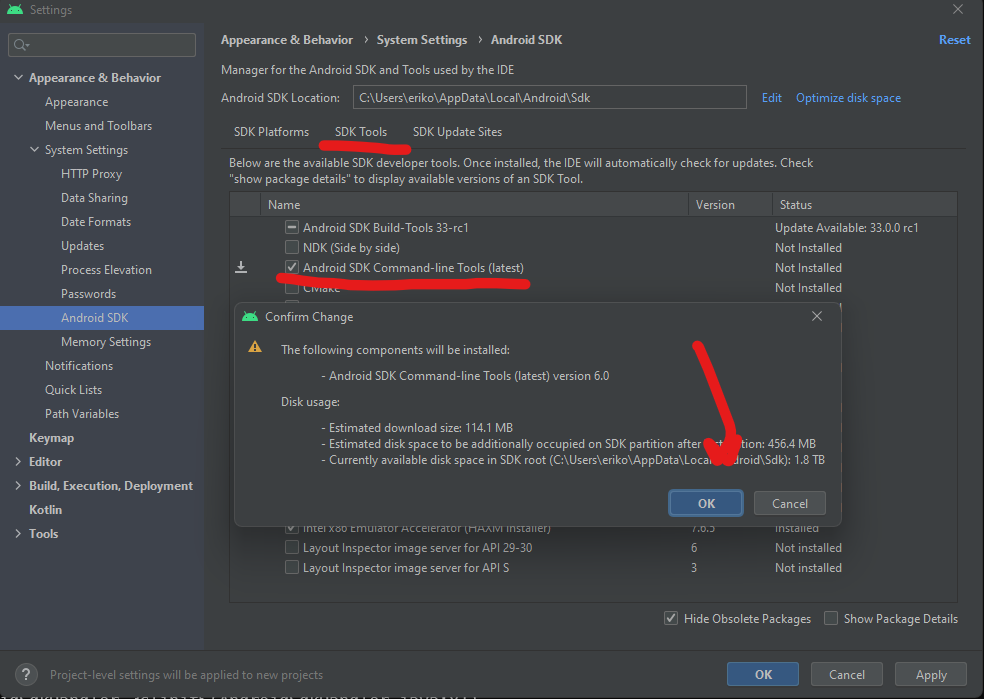
After that step add the platforms you're interested in, in this case Android
> npx cap add android
> npx cap add android
I recommend reading the capacitor documentation on workflow with a hybrid native app. The gist is this
Run npx cap sync to copy your web project into capacitor
Run npx cap run android to start the project on android (or start in the Android SDK)
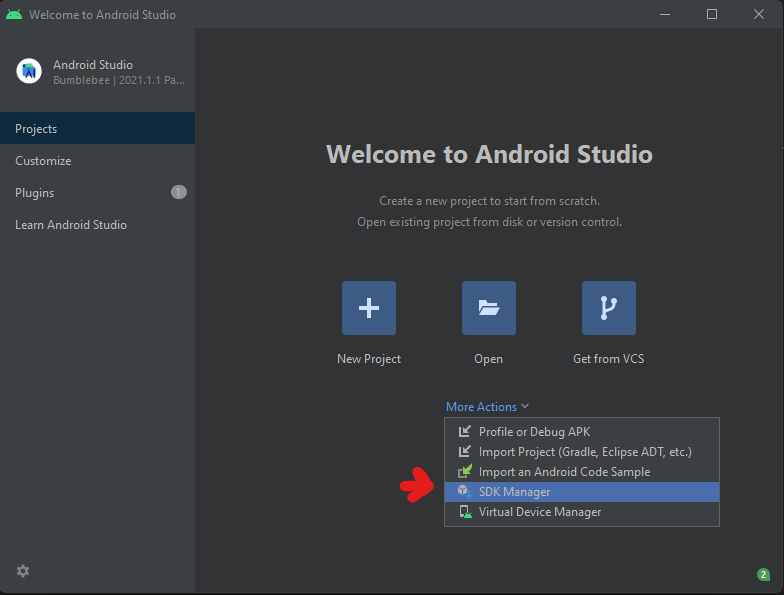
Now that we have Android all setup we can start the app with the capacitor command line.
The gist is that it copies the final compiled html/css/js assets from your favorite frontend frameworks and build tools into the native container
> npx cap sync
> npx cap sync
After that we can open it in Android Studio with the capacitor commandline
> npx cap open android
> npx cap open android
Building the project and running the first time can take some time, so be patient after hitting the big green play button.
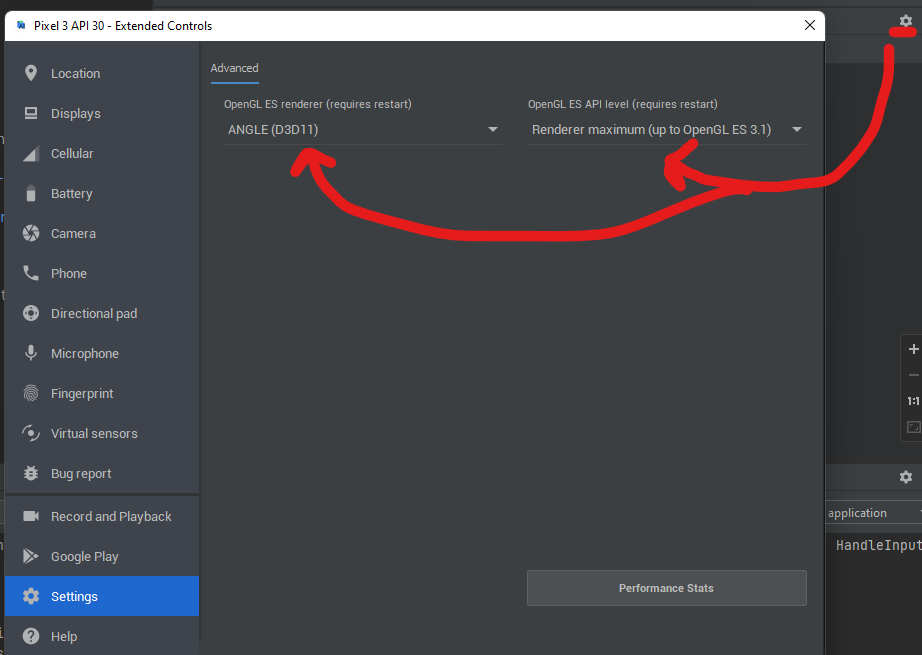
ProTipTMThe Emulator is MEGA slow to start so once you get it on, leave it on. You can redeploy the app to a running emulator with the "re-run" hightlighted below.
If your Android emulator crashes on the first try like mine did with something like The emulator process for AVD Pixel_3a_API_30_x86 was killed, this youtube video was super helpful. For me the problem was disk space, the AVD needs 7GBs of disk space to start so I had to clean out some junk on the laptop 😅
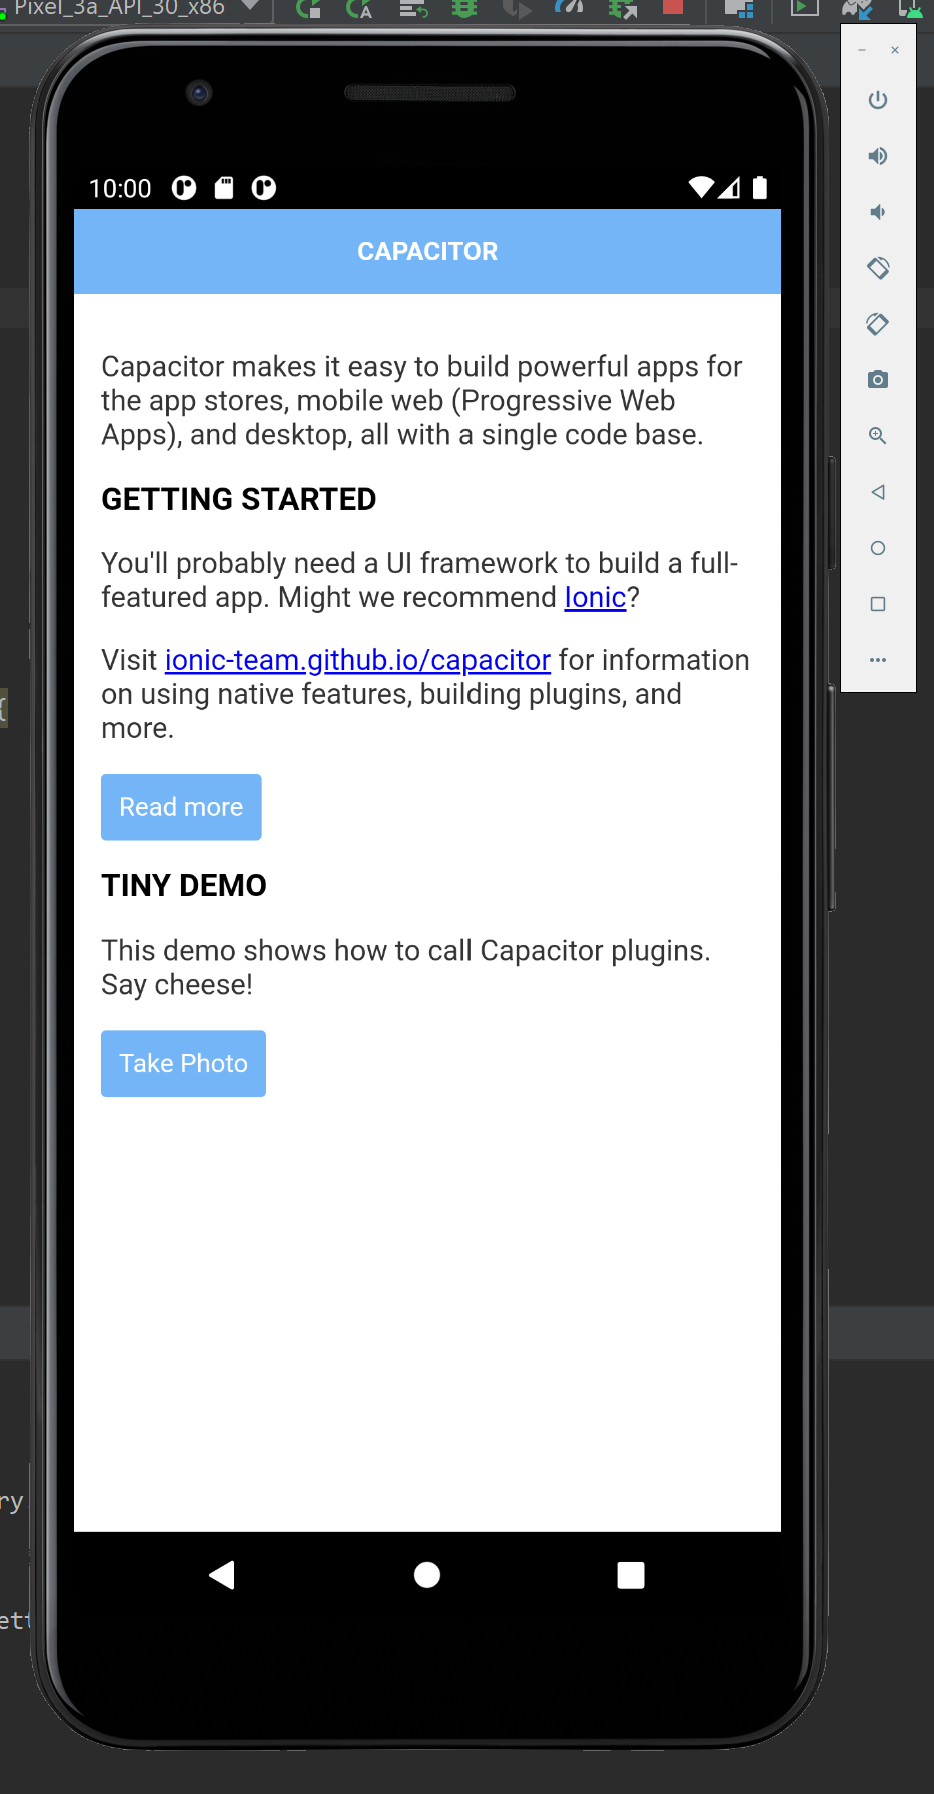
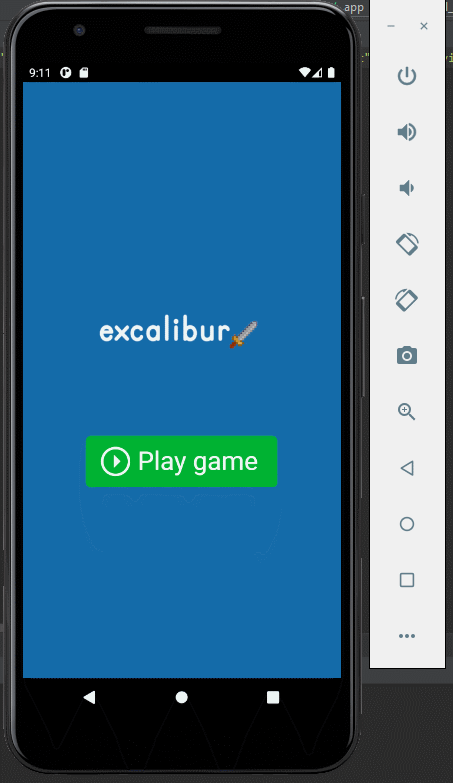
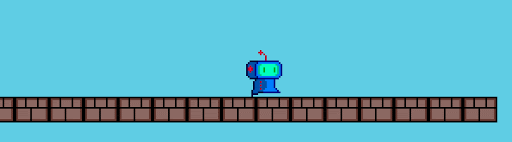
The dev cycle is pretty slick, run npm cap copy android to move your built JS living in the www to the right android folder. The default app looks like this after running it in the android emulator.
First let's setup our TypeScript by installing and creating an empty tsconfig.json
> npm install typescript --save-dev --save-exact
> npx tsc --init`
> npm install typescript --save-dev --save-exact
> npx tsc --init`
Recently I've been a big fan of parcel(v1) for quick and easy project setup, and it works great with excalibur also webpack is cool too if you need more direct control of your js bundling.
> npm install parcel --save-dev --save-exact
> npm install parcel --save-dev --save-exact
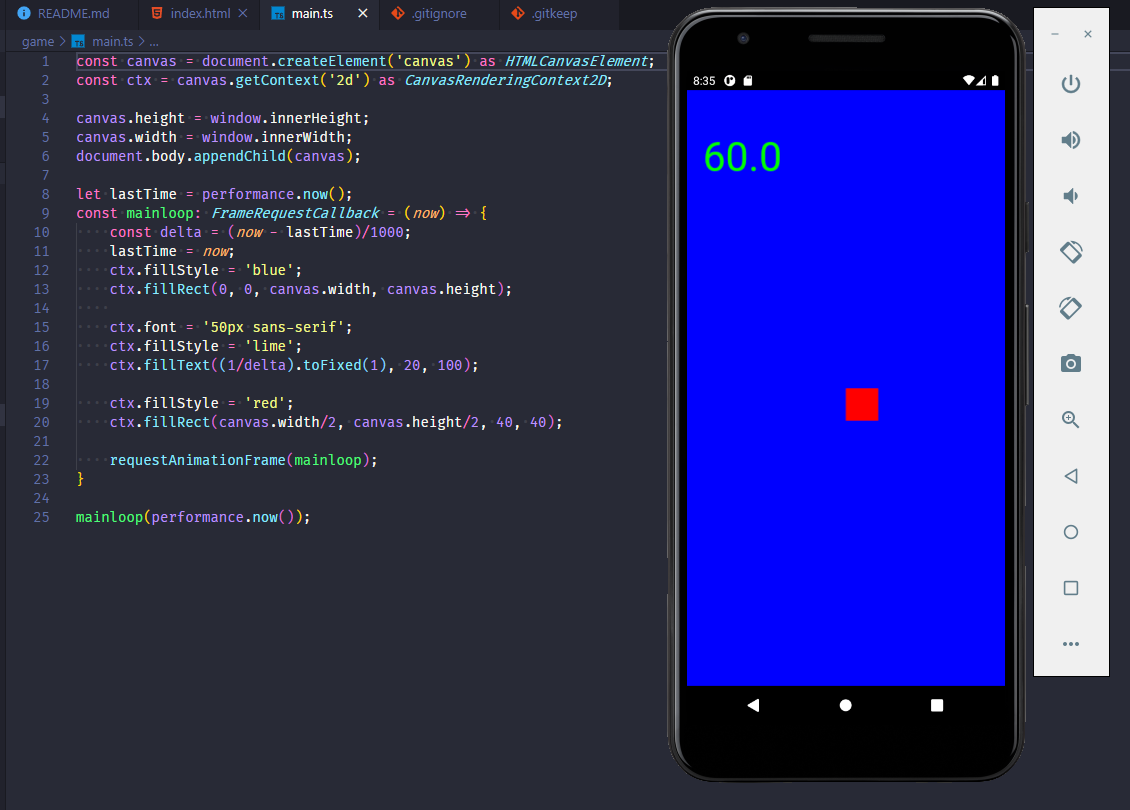
I copied the generated manifest.json, index.html, and css/ folder out of the original generated www/ and put it into game/.
We need to setup our development and final build script in the package.json. The npm "start" script tells parcel to run a dev server and use game/index.html as our entry point to the app and follow the links and build them (notice the magic inline <script type="module" src="./main.ts"></script>) ✨
In this setup I'm sending all my built output with --dist-dir into the www directory, which is what capacitor will copy to android. I went ahead and deleted the provided default app in the www directory.
Using the Excalibur engine with capacitor and parcel will be a breeze! Really any web based game engine could be substituted here if you want. Here is the source on github!
// Original asset is at a 45 degree angle need to adjust
actor.rotation = delta.toAngle() +Math.PI/4;
});
constactor=newActor({
x: game.halfDrawWidth,
y: game.halfDrawHeight,
width: 40,
height: 40
});
actor.graphics.use(sword.toSprite());
game.add(actor);
});
Note, depending on your emulator settings you may need to tweak it's graphics settings and restart Android Studio for it to build and run (This works out of the box fine on real hardware tested in BrowserStack, for some reason the emulator graphics can be confused)
After the winter break, the team has released [email protected] with a lot of improvements to the core engine and plugins! Check the roadmap for our current plans.
Debugging why things aren't working has historically been pretty difficult. This plugin will greatly assist in the game development cycle. Nearly everything is available and configurable.
The Tiled plugin now implicitly adds a z-index to each layer (which can be overridden) which means things will look as you expect in Excalibur as they do in the Tiled editor.
Set the starting layer z (defaults to -1) and get gaming!
When v0.25.0 was released, it was a "monolithic" renderer design, meaning everything Excalibur could possibly draw was built into a single renderer and shader program. This became onerous fairly quickly. And as the old adage goes: "you don't know how to build something until you've built it twice".
With v0.25.2, each type of drawing is split internally into separate renderer plugins. While this does come with some overhead when switching shader programs, it's worth it for the the simplicity, maintainability, and extensibility benefits.
Excalibur now allows you the ability to control the WebGL image filtering mode both implicitly and explicitly. Really this means Excalibur will try to pick a smart default, but allows overrides
Excalibur knows how to draw many types of graphics to the screen by default comes with those pre-installed into the ExcaliburGraphicsContext. However, you may have a unique requirement to provide custom WebGL commands into Excalibur, this can be done with a custom renderer plugin.
We've had a lot of community engagement this iteration, especially through the issues and github discussions. Lots of good issues, and lots of cool things in the show and tell
Big thanks to everyone who helped with this release:
We are progressing at full speed toward the v1 vision, there is still a lot to do but the end is in sight. Here are a few things that I'm personally really excited for:
Event system redo
Particle system refactor
Final deprecation of old drawing api
New TileMap enhancements for hexagonal and isometric maps
This was a point release, but despite that a lot of exciting things were added! Looking forward to v0.26.0!
After a year of work, a lot of great additions and improvements have made it into Excalibur, and we are making good progress towards our v1.0 release! Check the development roadmap for our current plans. It's hard to believe how different things are now since the first commit of Excalibur (back when it was called GameTS)!
Excalibur started as a tech demo in a presentation to show how powerful TypeScript can be. The engine has come so far since then, it's really amazing!
We are really excited to share this release with you! This release contains over 30 bug fixes and 50 new features! It's been a labor of love over the last year by many people, and we have some big features to share.
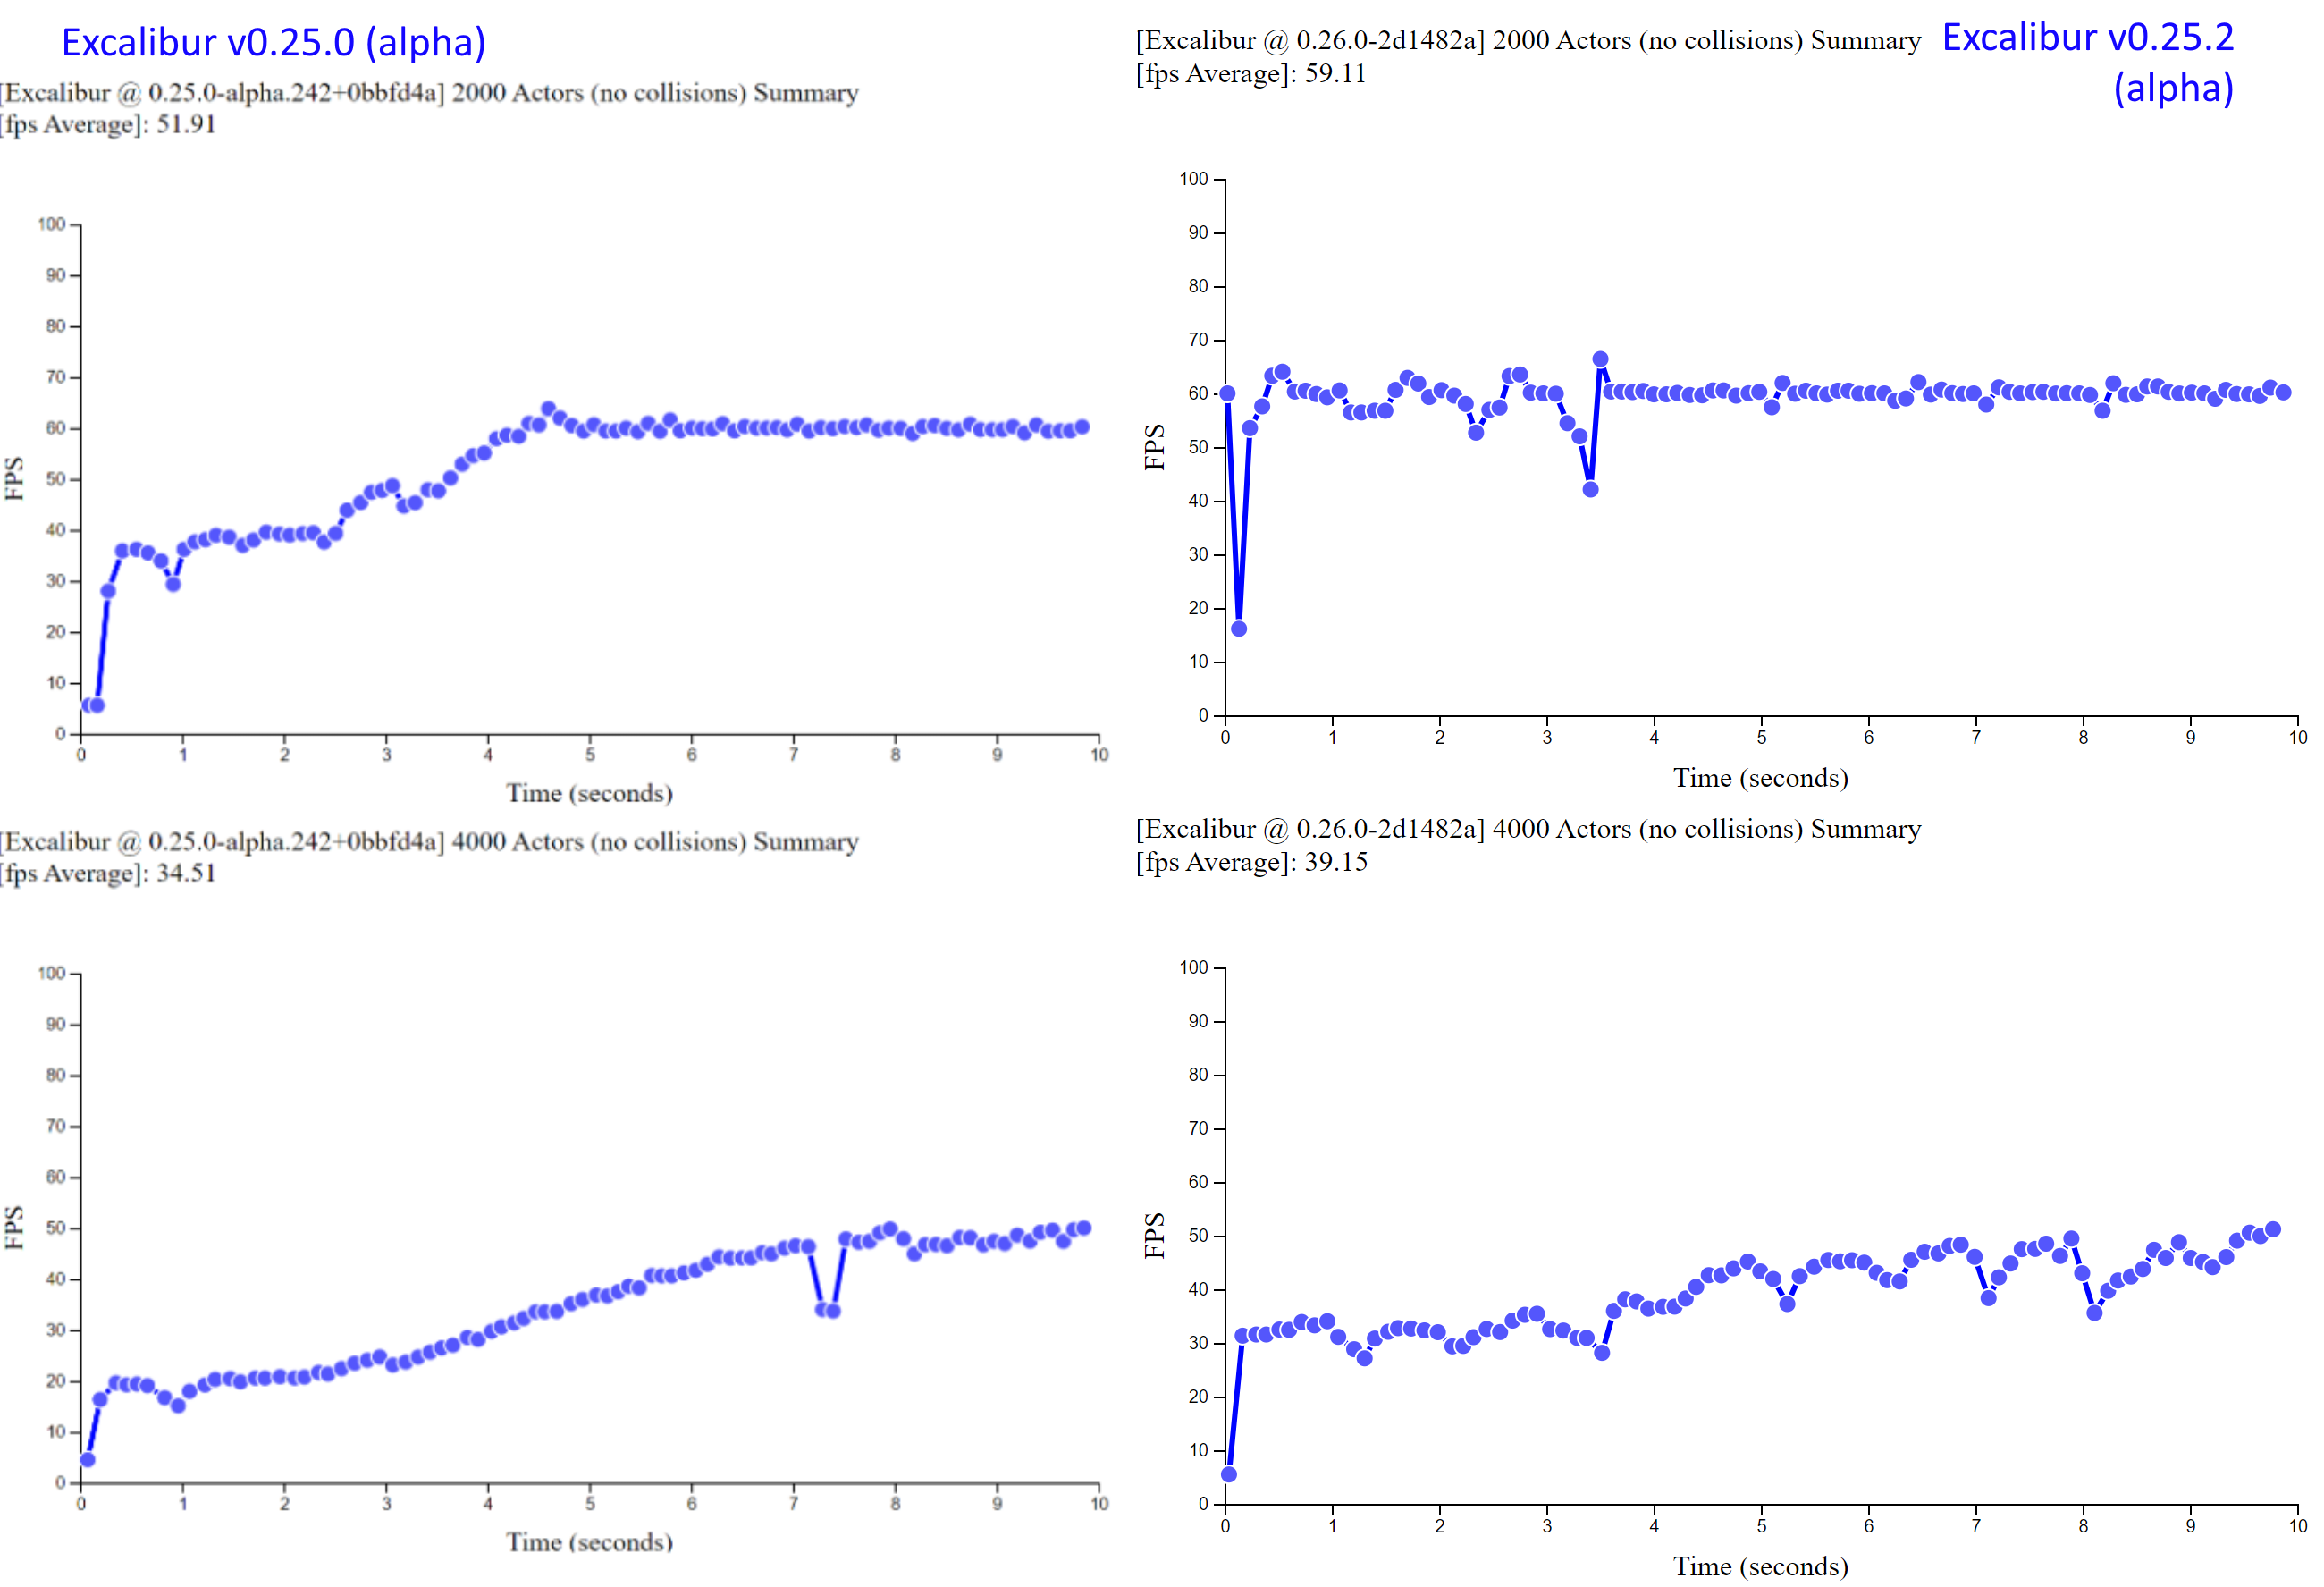
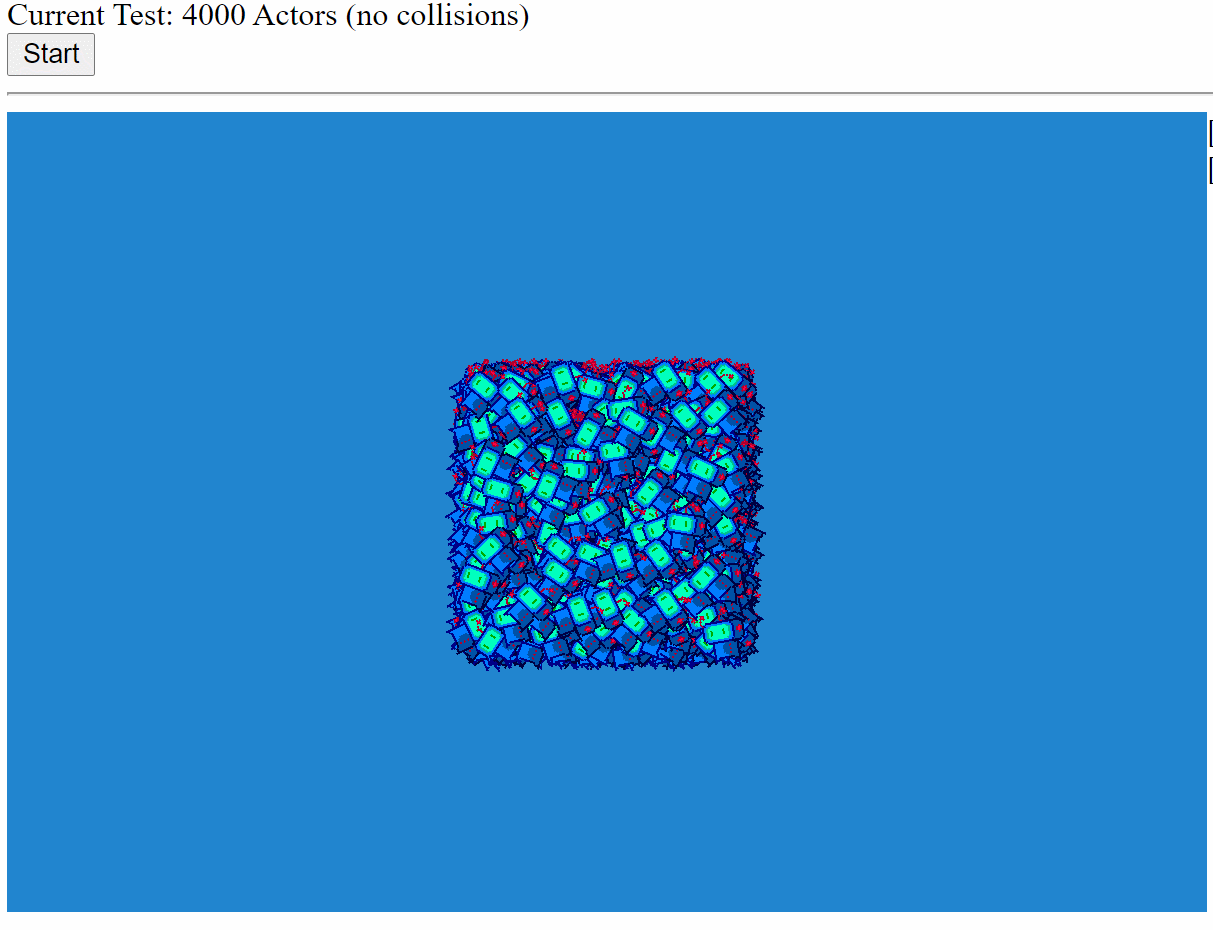
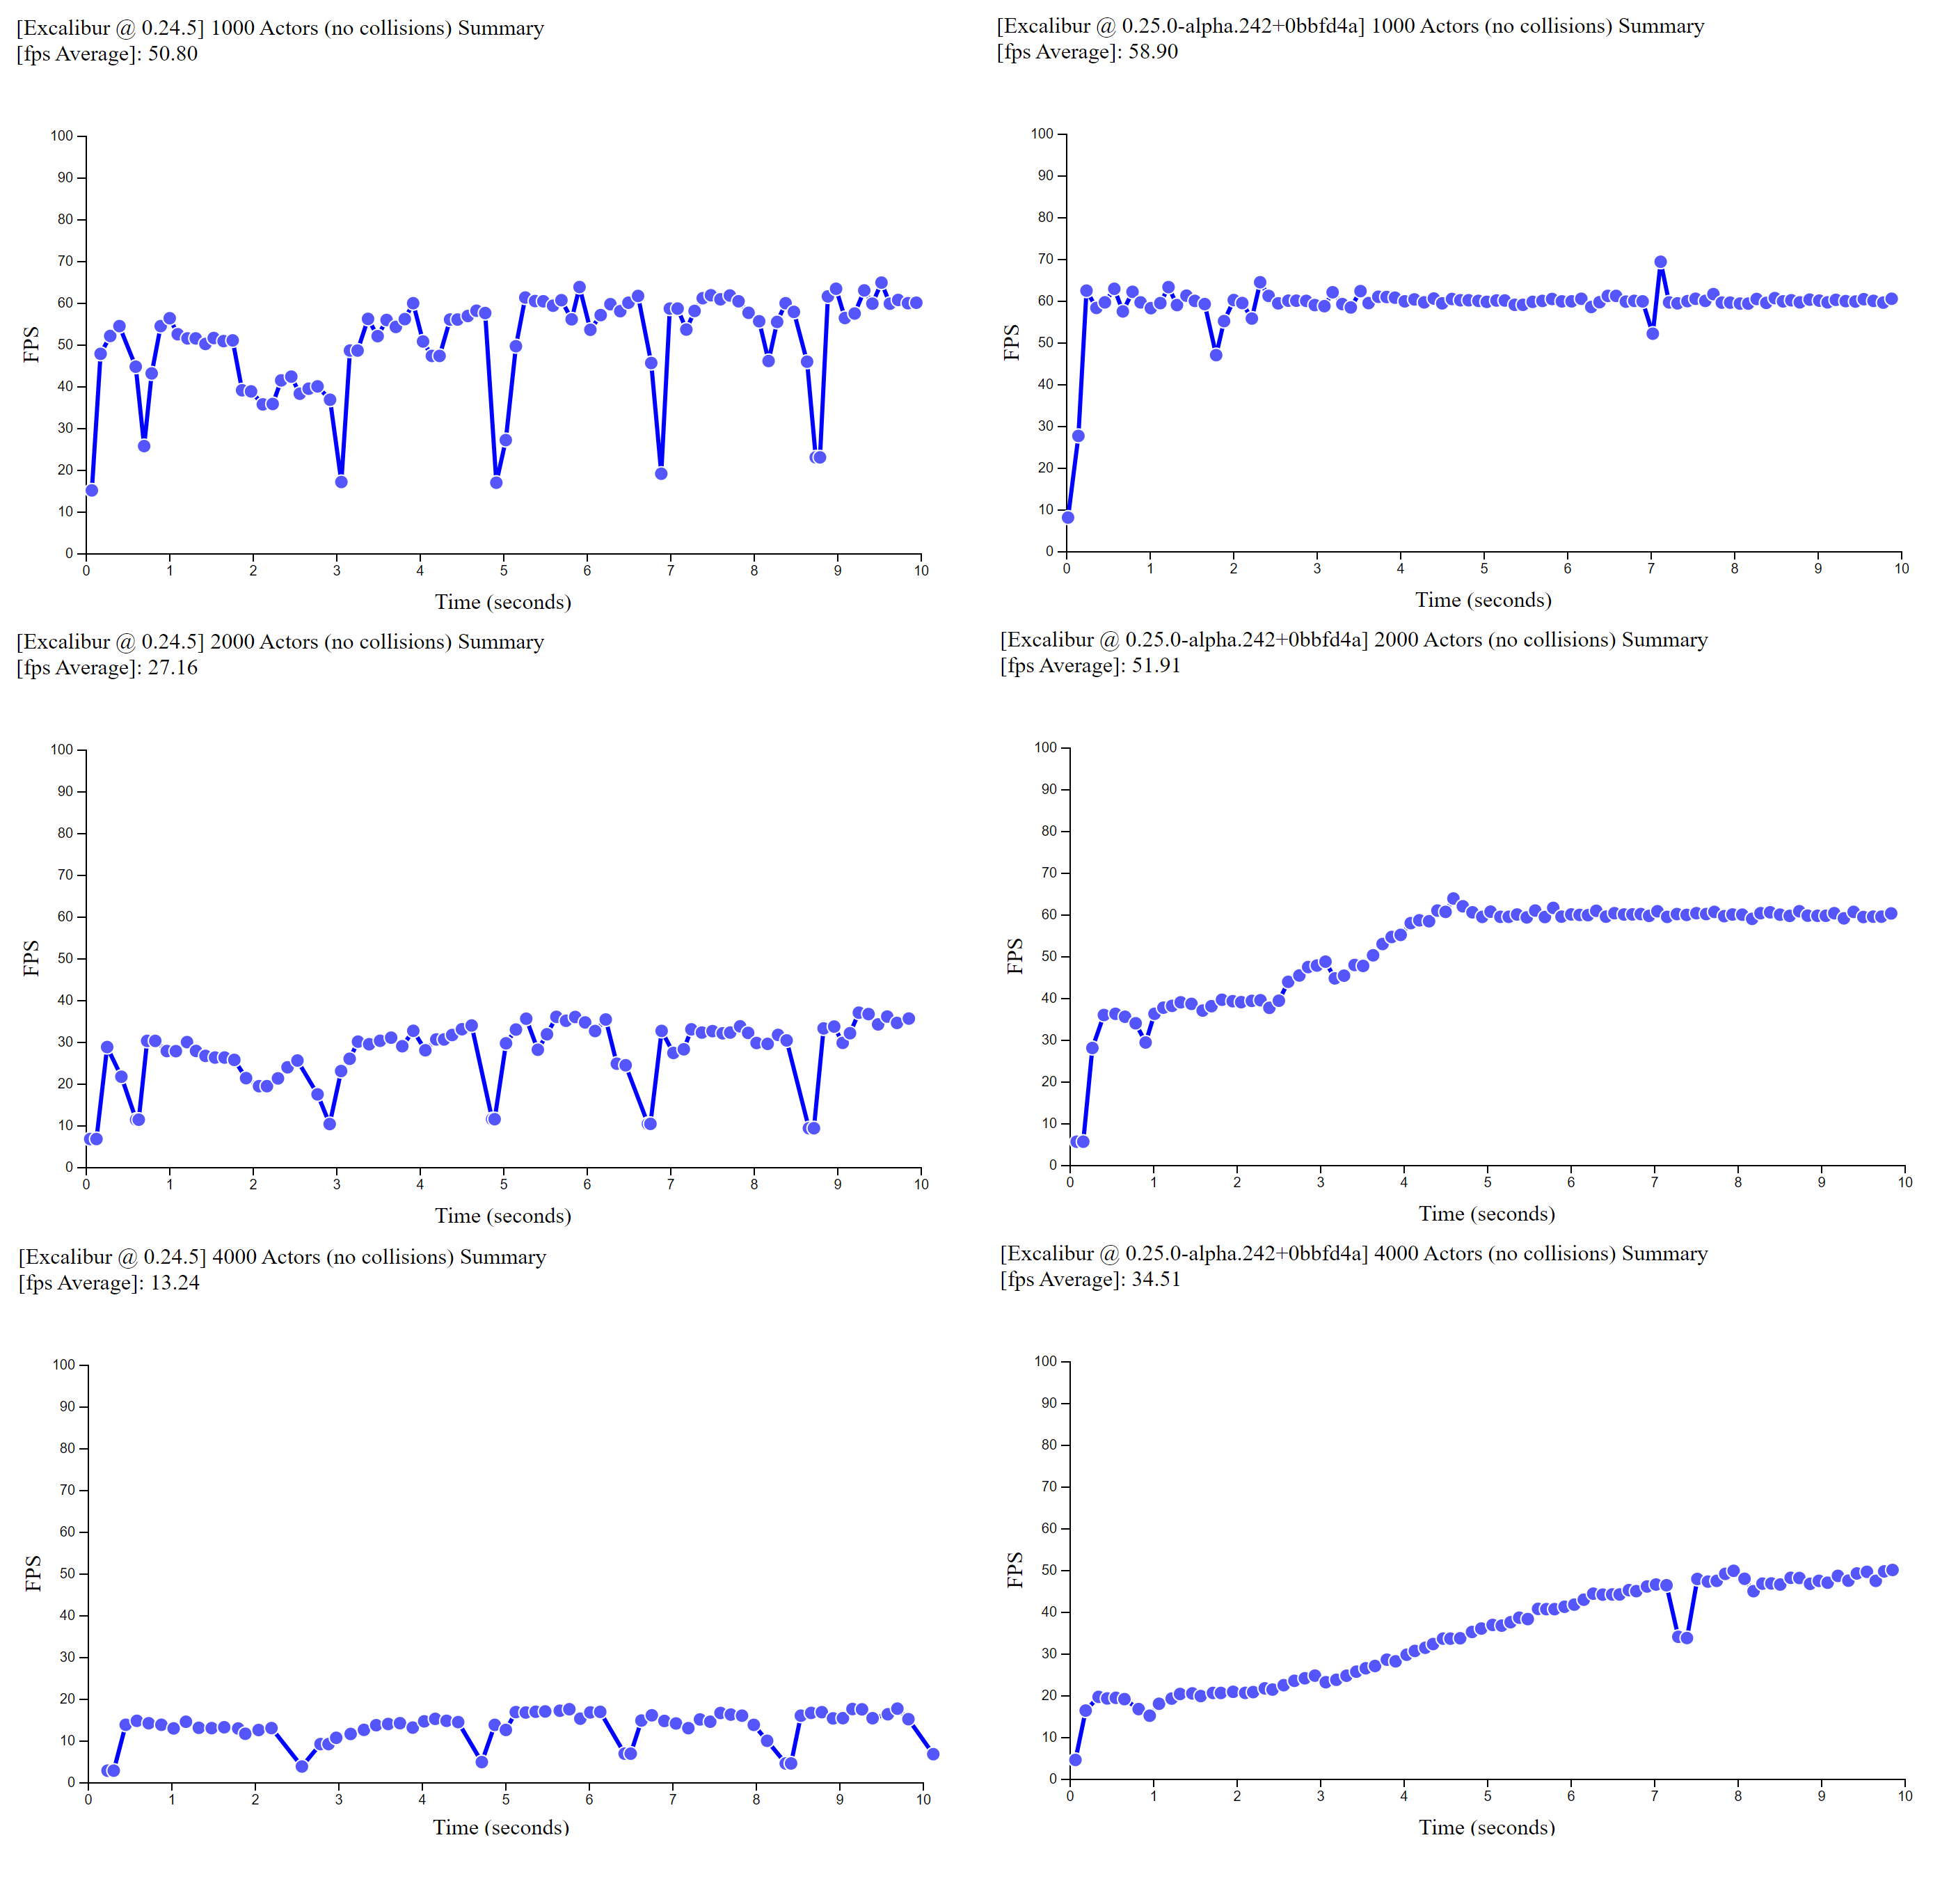
There is a combination of features (mentioned below) that resulted in big performance gains. Across the board, there's been a dramatic increase in what Excalibur can do in v0.25.0 vs v0.24.5.
In the gif below, we demonstrate the graphics performance specifically.
There is much better performance across the board with a higher baseline FPS in v0.25.0 for the same number of actors. You'll notice that FPS improves over time as more actors are offscreen in v0.25.0 compared to v0.24.5.
This benchmark was performed in the Chrome browser on a Surface Book 2 with the power plugged in.
We are adopting a similar versioning strategy to Angular, during pre-1.0. All plugins compatible with the core library will share the same prefix through the minor version. For example, if core Excalibur is [email protected], then the plugins that support that version are formatted like @excaliburjs/[email protected].
Excalibur DisplayModes have been refactored and renamed to clarify their utility.
FillContainer - Fill the game viewport to take up as much of the immediate parent as possible
FillScreen - Fill the game viewport to take up as much of the screen as possible
FitContainer - Fit the game maintaining aspect ratio into the immediate parent
FitScreen - Fit the game maintaining aspect ration into the screen
Fixed - Specify a static size for the game width/height
Refactor to Entity Component System (ECS) based architecture
The core plumbing of Excalibur has been refactored to use an ECS style architecture. However, developers using Excalibur do not need to know or care about the this underlying change to ECS if they don't want to.
What does ECS mean for Excalibur? At a high level, ECS architecture breaks down into three things:
Components contain data needed for various systems.
Systems implement the "behavior" by looping over entities that match a list of components.
For example, the graphics system processes all entities with a TransformComponent and a GraphicsComponent
Entities are the "holders" of components
Actor, Scene, and Engine remain as the familiar interface to build games; they're only implemented differently under-the-hood. The reason for the change was to break down ever-growing and complex logic that had accumulated in the Actor and Scene implementations into Components and Systems for maintainability. This change increases the flexibility of Excalibur, and allows you to add new novel behavior directly into the core loop with custom components ones if you desire.
Excalibur does not have the purest implementation of an ECS by design; our built-in components are more than just data. The built-in components do provide behavior, convenience features, and helper functions to maintain our core mission of keeping Excalibur easy to use. The Excalibur core team goal with ECS is flexibility and maintainability, not performance. If you wish, you can read more about our goals for ECS.
Here's A quick example of using the new ECS features:
The collision system has been significantly overhauled to improve the quality of the simulation and the stability of collisions. The core simulation loop "solver" has been redone to use an iterative impulse constraint solver, which provides a robust method of computing resolution that has improved performance and stability.
Collision intersection logic has now also been refactored to report multiple contact points at once. Multiple contacts improves the stability of stacks of colliders over single contact collisions (which can result in oscillations of boxes back and forth).
Colliding bodies can now optionally go to sleep. This relieves some of the pressure on the collision solver and improves the stability of the simulation by not moving these objects if they don't need to move. Colliders can be started asleep before a player in a game might interact with them
New CompositeColliders now make it possible to combine Excalibur Collider primitives (PolygonCollider, CircleCollider, and EdgeCollider) to make any arbitrary collision geometry. These new composite colliders power the new TileMap cell collisions and also power the new ex.Shape.Capsule(width, height) collider.
The Capsule collider is a useful geometry tool for making games with ramps or slightly jagged floors you want a character to glide over without getting stuck. This collider also helps with any "ghost collisions" that you might run into under certain conditions in your game.
CollisionGroups allow more granular control over what collides above and beyond collision type. Collsion groups allow you to create named groups of colliders like "player", "npc", or "enemy". With these groups, you can specify that players and enemies collide, player and npcs don't collide, and that npcs and enemies don't collide without needing to implement that logic in a collision event handler.
typescript
// Create a group for each distinct category of "collidable" in your game
The new Excalibur graphics system has been rebuilt from the ground up with speed in mind. It is now built on a WebGL foundation with a built-in batch renderer. This means that Excalibur will batch up draw commands and submit the minimum amount of draw calls to the machine when the screen is updated. This dramatically improves the draw performance and also the number of things wec can display on screen (as noted in the benchmarks earlier).
For drawing hooks the ExcaliburGraphicsContext is replacing the browser CanvasRenderingContext2D. If you still need to do some custom drawing using the CanvasRenderingContext2D the new Canvas graphic can help you out.
typescript
constcanvas=new ex.Canvas({
cache: true, // If true draw once until flagged dirty again, otherwise draw every time
draw: (ctx:CanvasRenderingContext2D) => {
ctx.fillStyle ='red';
ctx.fillRect(0, 0, 200, 200);
}
});
actor.graphics.use(canvas);
typescript
constcanvas=new ex.Canvas({
cache: true, // If true draw once until flagged dirty again, otherwise draw every time
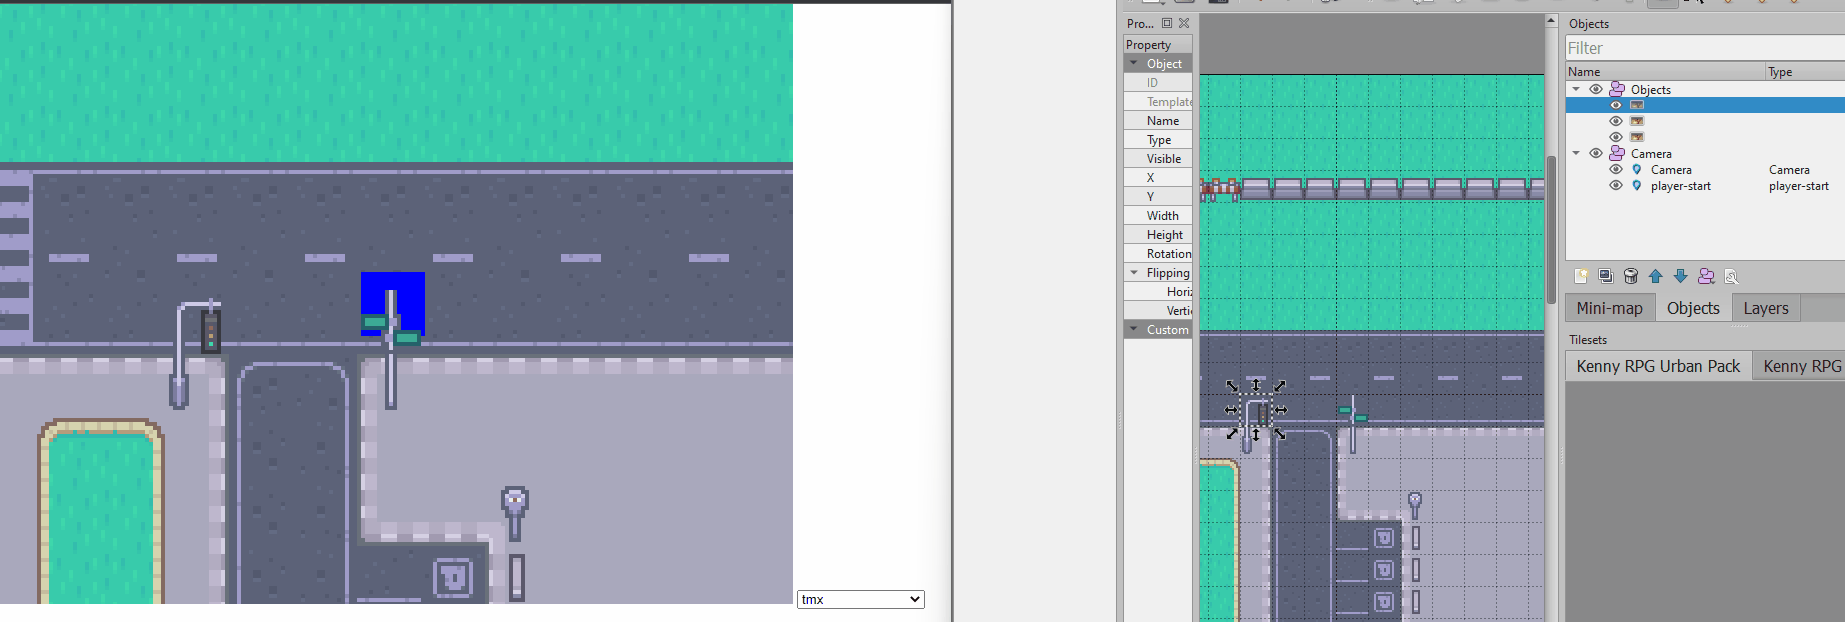
Tiled is easily one of the best tools out there for building and designing levels for your game. It has certainly been a valuable tool in our toolbox. We have doubled down on our efforts to provide a first class Tiled integration with Excalibur via the excaliburjs/plugin-tiled. This work also involved a few improvements to the TileMap to improve it's graphics API and collision performance.
A lot of time was spent reviewing and improving our documentation. Part of this work was ensuring that the snippets don't go stale over time by building them in GitHub Actions.
Please check out the new and shiny doc site with new code examples at excaliburjs.com!
The Excalibur core repo now has WallabyJS enabled to improve the VS Code test development and debugging experience. Wallaby is a paid tool; because of that Excalibur will always also support the Karma based testing framework for official tests.
A useful update to excalibur-jasmine allows async matchers, which greatly simplifies checking image diffs in Jasmine unit tests.
typescript
it('should match images', async () => {
let engine =new ex.Engine({width: 100, height: 100});
A brand new integration test utility has been created called @excaliburjs/testing, which provides a quick way to drive Excalibur games with Puppeteer and do image-based snapshot testing.
typescript
// excalibur testing
test('An integration test', async (page) => {
// Check for the excalibur loaded page
awaitexpectLoaded();
// Compare game to expected an expected image
awaitexpectPage('Can check a page', './images/actual-page.png').toBe('./images/expected-page.png');
// Use puppeteer page object to interact
await page.evaluate(() => {
var actor = ((window asany).actor);
actor.pos.x =400;
actor.pos.y =400;
});
// Compare game to a new expected image
awaitexpectPage('Can move an actor and check', './images/actual-page-2.png').toBe('./images/expected-page-2.png');
});
typescript
// excalibur testing
test('An integration test', async (page) => {
// Check for the excalibur loaded page
awaitexpectLoaded();
// Compare game to expected an expected image
awaitexpectPage('Can check a page', './images/actual-page.png').toBe('./images/expected-page.png');
// Use puppeteer page object to interact
await page.evaluate(() => {
var actor = ((window asany).actor);
actor.pos.x =400;
actor.pos.y =400;
});
// Compare game to a new expected image
awaitexpectPage('Can move an actor and check', './images/actual-page-2.png').toBe('./images/expected-page-2.png');
There are some breaking changes in v0.25.0 from v0.24.5; see the changelog and release notes for more specifics, but they generally fall into the categories below. See the migration guide for guidance.
New APIs replacements
Graphics API
Actor drawing functions moved to graphics component
API renames for clarity
Bug fixed necessitated change
Extracted behavior to a plugin
Perlin noise is now offered as a plugin and is no longer included in the core library @excaliburjs/plugin-perlin
Big plugin changes
The Tiled plugin is now published under @excaliburjs/plugin-tiled and will start with version v0.25.0
This is a big release for Excalibur on our journey to 1.0.0. If you’d like to follow along, we now have a tentative roadmap available! The goal for this release was to simplify our collision infrastructure and utilities.
Thanks to our community contributors for all of their help! (see the full release notes)
Collision groups have been re-implemented to be more in line with industry practice. They allow you to determine which colliders collide with others.
Collision behavior and properties are now contained within the new type ex.Collider
Collision types are now sourced from ex.Collider
Collision groups now live on ex.Collider
Collision shapes dictate collision geometry live on ex.Collider
Collision pixel offset allows shifting of colliders by a pixel amount
Properties like mass, torque, friction, inertia, bounciness are now all part of ex.Collider instead of ex.Body
Decoupling Actor from the collision system
ex.CollisionPair now works on a pair of Colliders instead of a pair of Actors to represent a potential collision
ex.CollisionContact now works on a pair of Colliders instead of a pair of Actors to represent an actual collision
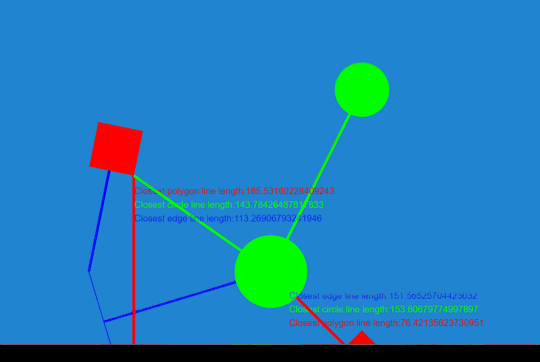
New helpful methods for colliders
Find the closest line between 2 colliders or shapes
ex.Actor.within now works based on the surface of the geometry, not the center of the object
Actions moveBy, rotateBy, and scaleBy have been changed to move an actor relative to the current position
This change makes implementing patrolling behavior moving 400 pixels left and right forever as easy as: actor.actions.moveBy(-400, 0, 50).moveBy(400, 0, 50).repeatForever();
Many name refactorings and deprecations to improve usability (see the full release notes)
We had the fortunate opportunity to get out of the city for a bit and take a vacation preceding the game jam. We wanted to take advantage of our time away from home, so we instituted regular work days (8 hours), rather than the 10-12 hour days we usually fall into the trap of doing . And surprise, it went great! Everyone was more relaxed, and we delivered a quality game in less time! It was easier for the team to focus on getting stuff done. We also managed to finish early, just ahead of the submission hour.
We did most of our work in Aseprite, with a little bit of Photoshop thrown in. A lot of the art in this game is simple shapes, and we recycled many of the backgrounds across the mini-games.
The theme was announced at 8:00 pm in our time zone. We spent the evening hours brainstorming, picking a few to develop a little more, and then deciding on our favorite choice.
We were ruthless at eliminating extras that tried to sneak in to the game. We had less time than we usually do, so we had to work efficiently. The resulting game is about half of the scope it had the potential to become, and we kept it under control.
We had to spend some extra time ahead of the jam updating our game template and tools. We could have done this at any earlier point. It wasn’t too bad, but it did cut a bit into our relaxation time for the days preceding the jam.
We also struggled again with managing state in Excalibur. We’re working on incorporating this into the Excalibur engine to improve the development process.
Overall, this Ludum Dare went great. We look forward to playing all of the cool games that we’ve seen so far for LD41!
The first commit to Excalibur.js was published on January 5th, 2013. Since then, we’ve been working to build a game engine that’s easy to develop with and fun to use. Along the way, we put together a release pipeline, constructed a test suite, wrote a lot of documentation, and created a number of extensions and samples. Here’s a quick rundown of some of the numbers:
There are some pretty big improvements coming up, and we’re looking forward to sharing those changes with you over the next year. We’re also working on a larger collection of samples and games to help new developers and showcase Excalibur’s capabilities. For a more detailed look, check out the roadmap.
We want to extend our sincere thanks to everyone who has written code, opened an issue, posted in our forum, or made a game and let us know about it. This is a very fulfilling project, and seeing others contribute to and use Excalibur means a lot to us. Thanks for your support!
In the few days before Ludum Dare, we made sure everything was ready. We set up version control, automatic deploys, and scripted tasks to help us build and develop the game. We ran into some problems during this setup, which is exactly why we do this early. These steps have become necessary for us before every game jam.
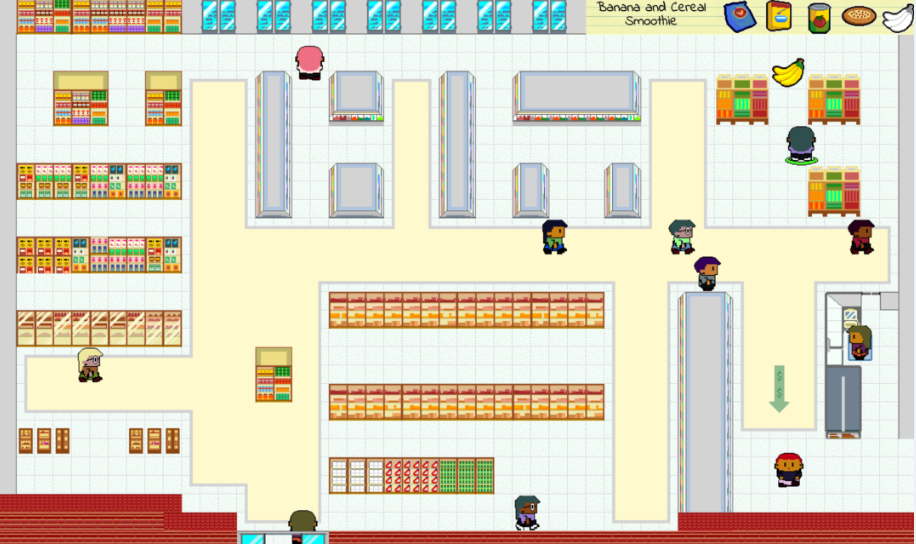
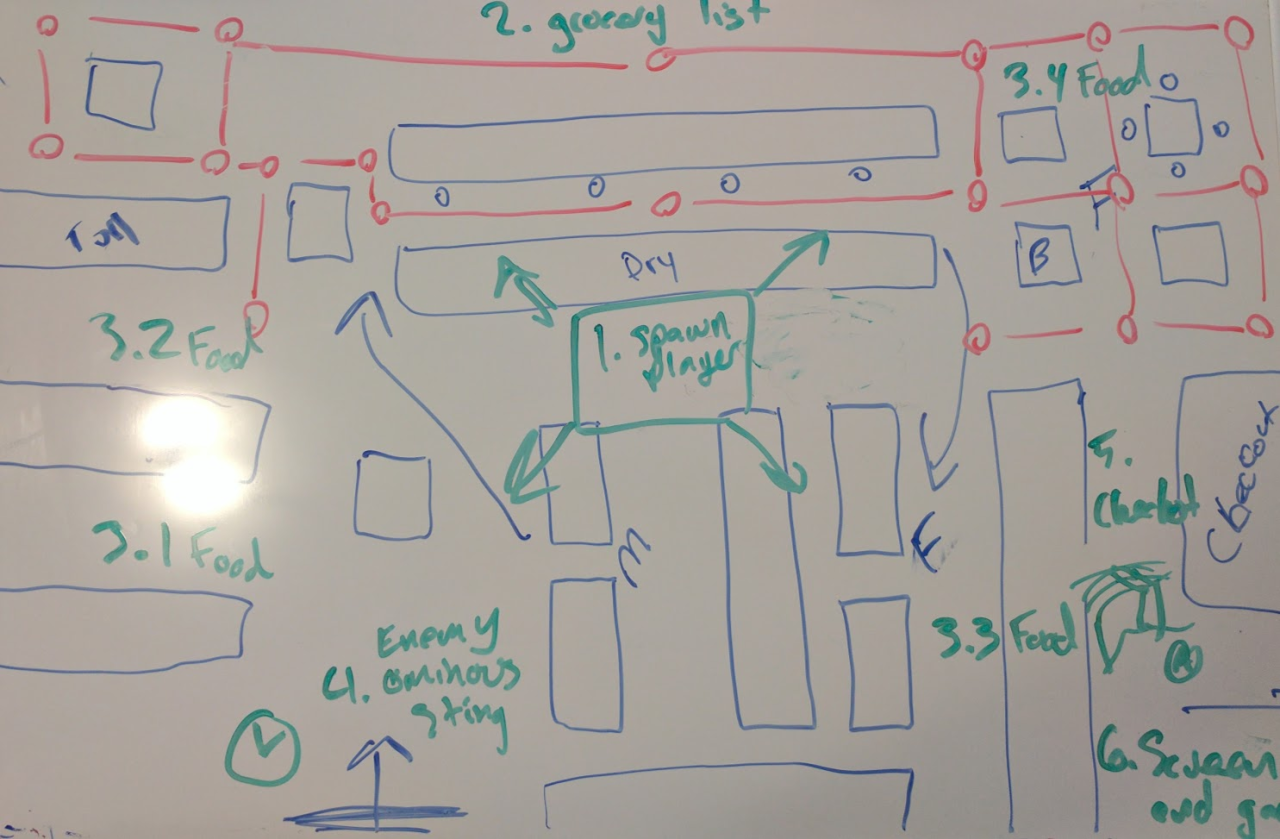
The theme was announced at 8:00 P.M. our time, and we spent the entire rest of the evening brainstorming. We made sure not to settle on anything too quickly, and came up with as many ideas as possible. From those fifty or so possibilities we picked a handful that seemed interesting enough to build. An hour or two later, we’d thrown all but one of those out, and settled on “avoid talking to people someplace – grocery store”.
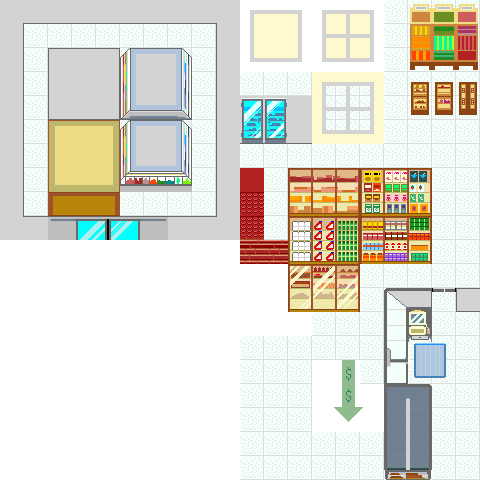
We built the first version of the game level on a dry erase board. This let us iterate on how a player would traverse it, as well as devise methods for pathfinding and item generation. Every time we’ve taken the time to do this step, we saved ourselves a load of heartache. Clearing up design issues is much simpler before the code has been written.
We had three team members working on art at different points in the weekend. We built the level, the characters, and the food items from scratch. It can be difficult to maintain a visual consistency when multiple people are drawing things; we mitigated a portion of this by standardizing on the “x11” palette built in to Aseprite, so at least all of our colors matched.
We didn’t make our own music this time, but we did design most of the sound effects using littleBits and a guitar. We feel like we did a good job of unifying the soundscape and setting a cohesive mood with the audio.
One of the most useful things we do is enforce the restriction of building a “playable” game as soon as possible. It doesn’t need any fancy extras, it just needs to let the player interact with and experience it. We managed to get to that point by Sunday morning, which left us two full days to add all those cool extras. It also allowed us to play the game a lot and polish the rough edges.
We started our game with a Yeoman template we built to structure the basics for us. We also reused a number of code snippets that we had left over from other games, including animation code and player input logic. Every little bit of time we saved helped us build this game better than we could have otherwise.
We hardly encountered any actual bugs in Excalibur this time around. We did put together a long list of potential improvements, though, and look forward to incorporating those into the engine.
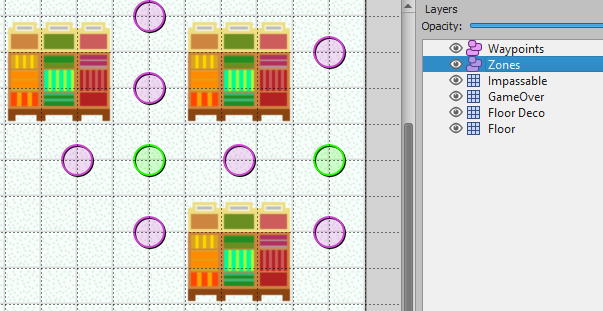
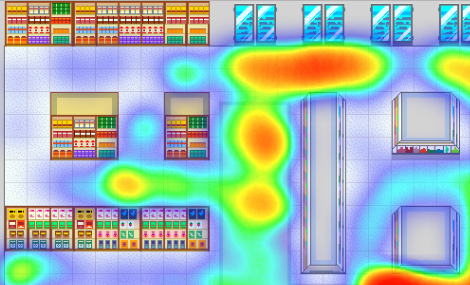
If you’re making a tile or grid-based game, Tiled is a great editor to build your levels in. We used it to define zones for our different grocery items to spawn in, as well as waypoints to define the shoppers’ movements.
We’ve tracked analytics in our games before, but we wanted a little more granularity this time. We configured custom analytics with Azure functions, and were able to track whatever game properties we wanted.
We ended each day after about 10:00 P.M. Ending early meant we could start early, and sleep is the best medicine for tired minds. We also cooked several meals instead of just getting fast food all the time. These two things were marked improvements from previous game jams.
We experienced a small complication with our custom Tiled plugin, due to a versioning issue with Excalibur. It wasn’t too difficult to fix, but it did slow us down a bit.
While the bug count this jam was low, it still wasn’t zero. One day, perhaps, but not this time. If anything, it’s better we run into these things before other users do, in order to prevent frustration with the development experience.
It was a bit difficult to get exactly what we were looking for in so short a time span. We managed to achieve most of the desired results, but there are still a few rough edges. We’ll be looking at adding pathfinding support directly into Excalibur in the future.
Every time we do a restrospective, the “what went well” section takes more and more space away from the “what didn’t go so well” section. It’s really encouraging to see this become a more interesting and rewarding process as we make new games. Ludum Dare was a lot of fun, and we hope to participate again someday.
We now have a utility from which Excalibur will provide useful statistics to help you debug your game. For now the stats are focused on Actors and specific frames; look for more helpful stats in future releases!
PhantomJS testing structure
Behind the scenes, we have new testing tools that will allow us to visually test complicated interactions on the canvas.
There were quite a few commits from the Excalibur community in this release. Thanks to FerociousQuasar and hogart for your contributions, and check out the full release notes for all of the details for this release.
We’ve implemented a rigid-body physics system, complete with edges, circles, and convex polygon primitives. This enables you to build fully-featured physics games in Excalibur! Fear not, the old physics system is still around for you to use.
We have improved our contributing document to make it easier to jump into Excalibur development. If you’re interested in helping out, read through our new Contributing documentation
Overall there were over 27 issues addressed in this release. Check out the full release notes for all of the details, including bug fixes and enhancements.