Happy New Year Excalibur!

We've put together a fireworks demo to commemorate the occasion!
Tap, click, or keypress to add more fireworks:
In 2024 a lot happened for Excalibur! We had 3 big releases v0.28.x, v0.29.x, and v0.30.x! Join the newsletter to make sure you don't miss a thing!
2 new core conributers: Matt Jennings & Justin Young
Thriving discord with lots of cool games being built 😍

RECORD number of outside code contributions to Excalibur! Everyone that's commented, made an issue, discussion, or commited to a repo!


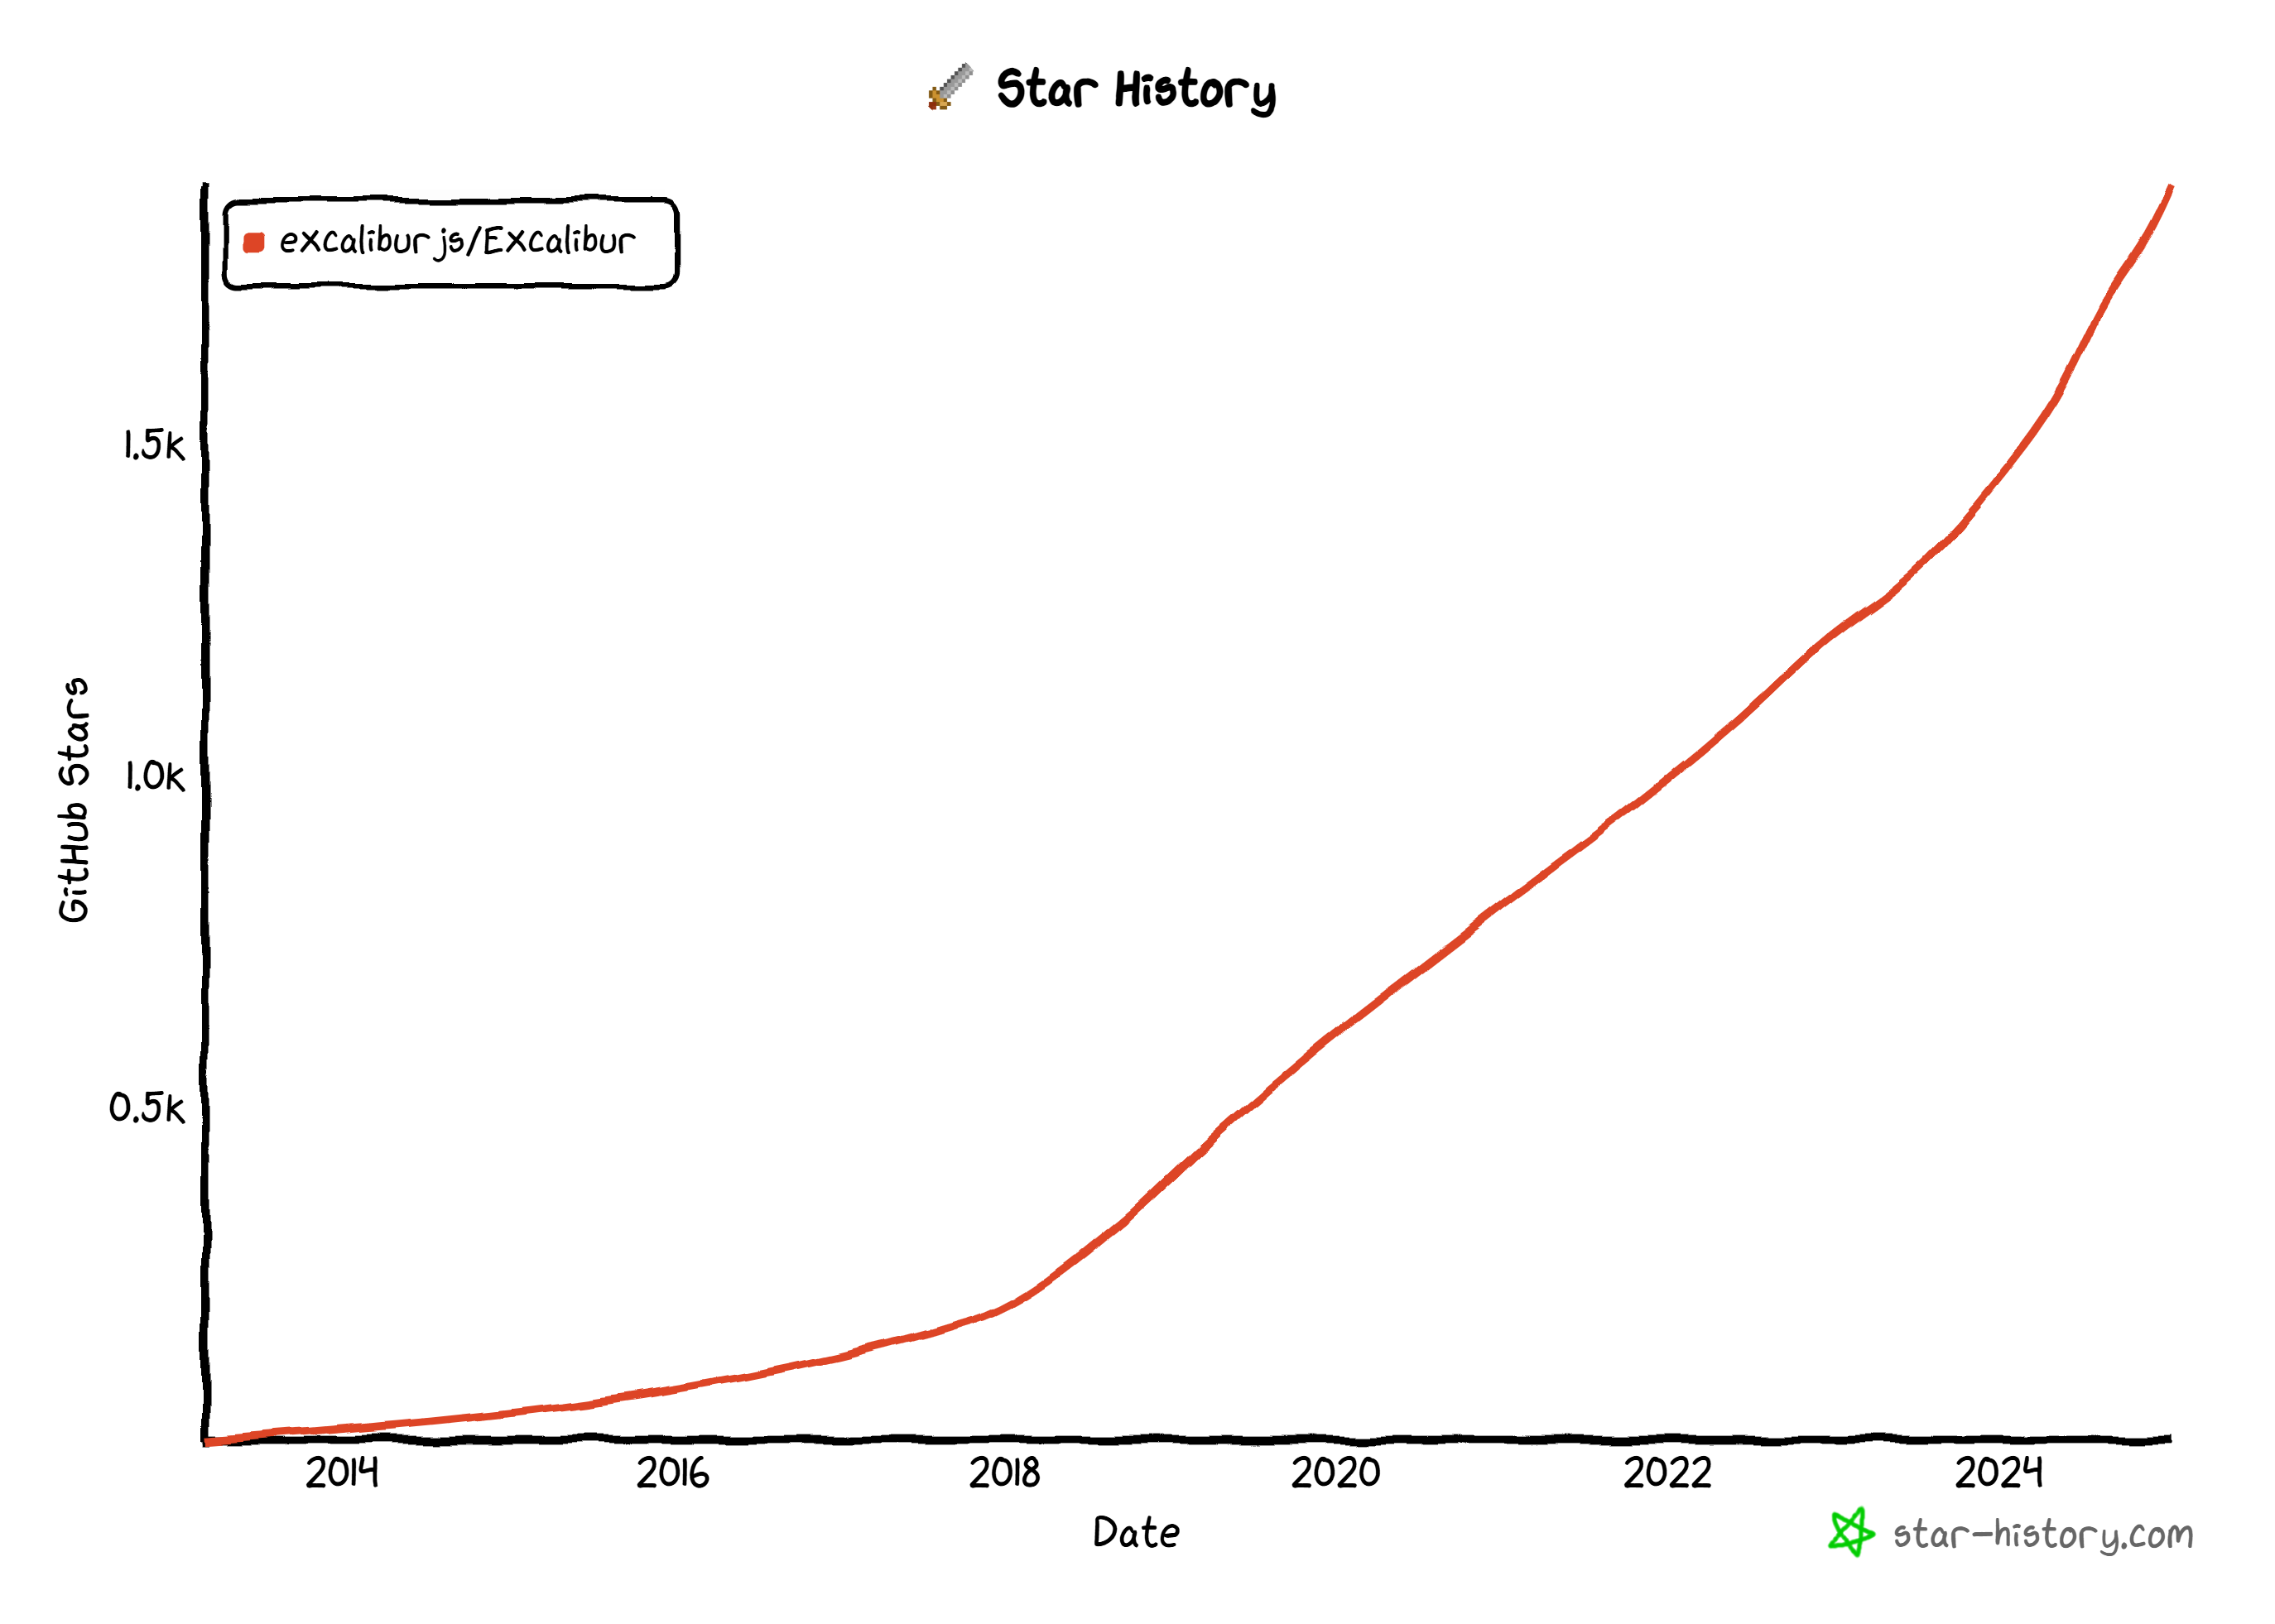
We are at 1.9k stars on github and growing, give us a star!
AND We have GitHub Sponsors & Patreons! Many thanks!
- 2 x Anonymous
- Ribsom
- PlanetCraft
- AdamE
- Latanya
- Feremabraz
- MRJP-Consulting
Highlights
Development Build & EcmaScript Modules
We now ship a excalibur.development.js, which provides additional debug information about issues that you would probably not want to ship to a production game. This provides a better development experience for our devs helping them find bugs faster.
Additionally we ship both an UMD and ESM bundle in Excalibur for modern bunders, the ESM build drastically reduces bundle sizes for folks.
Quick Start
A big boost to productivity is the new Excalibur CLI for quickly scaffolding games in your favorite bundler technology or even vanilla JavaScript! This tool pulls all our open source template repos from github.
sh
sh
This tool was built by contributor Manu Hernandez, big thanks to him for donating his time and building this great tool!
Accomplishments & Cool Stuff
You might notice a pattern here but Justin (aka Mookie) has been an MVP this year
Goal Oriented Action Planning by Justin Young
Wave Function Collapse by Justin Young
Dev.to Web Game Challenge Winner Justin Young
Demo Reel Games people are making in Excalibur
Performance
We've really turned the screws on performance in excalibur with v0.30.x being roughly 2-3 times faster than v0.29.x, both in the physics and the graphics! A lot of this was achieved through new data structures, and removing allocations from the hot loop using arena style object pools.
Check out the Excalibur Bunnymark for raw draw performance!
In the physics realm we switched to a new spatial data structure "SparseHashGrid" that seems to yield better performance than our "DynamicAABBTree" previously, especially for large numbers of colliders. Autsider666 really helped dig into this collision performance endeavor, check out his Idle Survivors. We can support many 100s of collisions at once!
Debugging
We have new debug drawing API you can use anywhere in your game to debug.
typescript
typescript
typescript
typescript
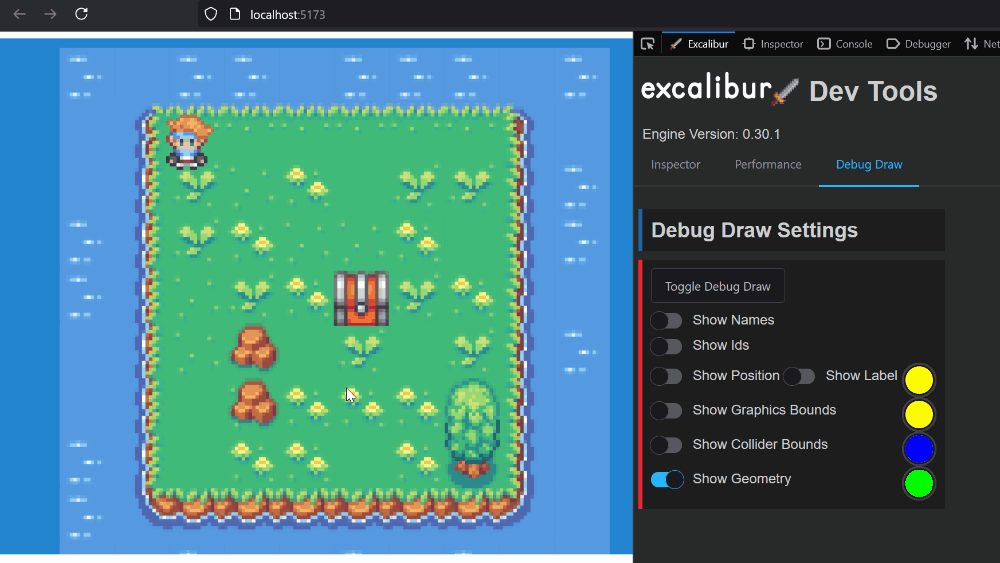
We now have a chrome & firefox extension to help debug your games in the browser. (This is a great place to contribute to open source! We have a LONG wish list for the plugin)
Big thanks to Adam Due Hansen for adding recent fixes that allow debug settings to be saved across browser refresh!
ECS (Entity Component System)
Simplified Custom System implementations
- Systems are passed an ECS world as a default constructor
- Systems can use any number of queries
typescript
typescript
New Tag Queries
- New simplified way to query entities
ex.World.query([MyComponentA, MyComponentB]) - New way to query for tags on entities
ex.World.queryTags(['A', 'B'])
Coroutines
These are a powerful tool for doing computation over time, and one of the best examples of that is animation. Coroutines are create for complex behavior and animations over time. They read very linearly for doing complex sequences over time compared to another approach where you might set flags and track timing in a class.
You can do lots of cool things in the body of coroutines in excalibur:
typescript
typescript

A more concrete example is in Jelly Jumper, where we use coroutines to handle the complex squash/stretch of player's graphic
typescript
typescript
Graphics
Pixel Art
First class pixel art art support with custom shaders/settings for the nicest looking pixel art you've ever seen. This removes common shimmering/banding artifacts that are visible when using pixel art with nearest neighbor filtering.
typescript
typescript
Check out pixelArt: true! Smooth as butter AA but still preserving the pixel art!
Compared with before when using antialiasing: false, you may need to go fullscreen but obvious banding and fat pixels are visible. This is a common visual issue when working with pixel art
The magic is doing subtle subpixel antialiasing along the pixel seams to avoid artifacts by adjusting the UVs and letting bilinear filtering do the hard work for us.
c
c
SVGs as Graphics
Did you know you can use SVG's now as graphics in excalibur?! You can!
You can inline an SVG string if you're really strong in SVG markup, or you want to generate SVG's on the fly!
typescript
typescript
Additionally you can load svgs from files
typescript
typescript
Nine Slice Sprites
Excalibur now supports Nine Slice Sprites! Thanks Justin!
Check out the demo app to play around with this feature!
Useful for creating bits of UI, or for tiling areas with a boarder!
typescript
typescript
Tiling Sprites & Animations
We now have convenient and performant tiling support for sprites and animations! You can specify you wrapping mode in x/y. If one of the dimensions exceeds the intrinsic width/height of the original image it can be Clamped (which stretches the last pixel), Repeat (which repeats the pixels from left to right), or RepeatMirror (which repeats the pixels from the last edge like a mirror).
typescript
typescript
This can also be done with animations!
typescript
typescript
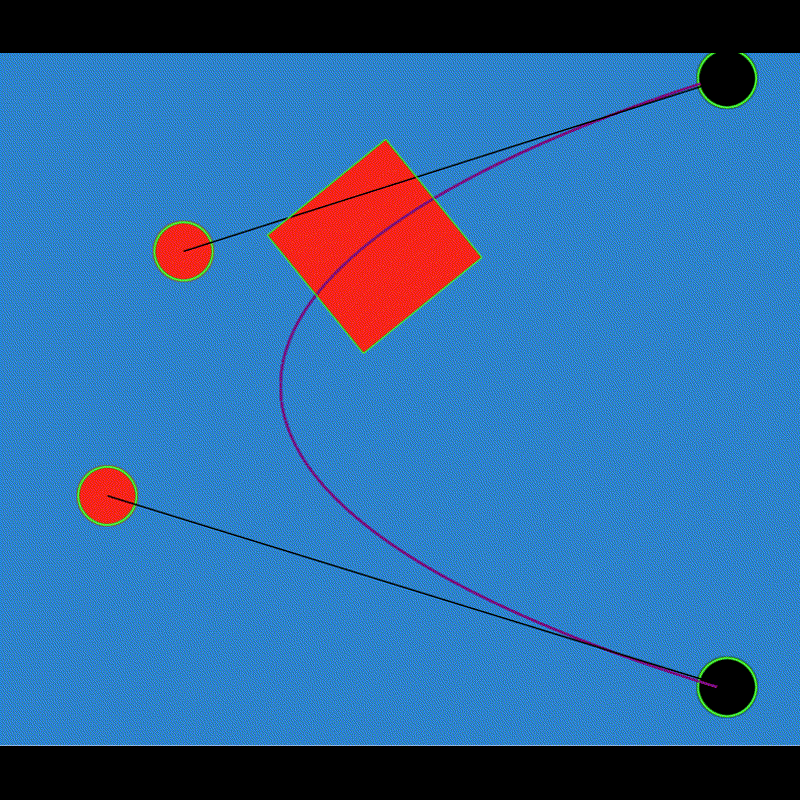
Bezier Curves
typescript
typescript
HTML UI with Pixel Conversion
Convert from Excalibur "world" pixles to CSS pixels, this is very useful when you want your game HTML to scale with the excalibur canvas and match up.
css
css
Here are some example repos of this being employed with HTML UI
GPU Particles
You already saw the fireworks! With GPU particles you can run hundreds of thousands of particles no sweat using instanced rendering with transform feedback under the hood. This means that the entire particle simulation runs on the GPU for maximum speed.
typescript
typescript
Materials
Use custom shader code to do neat effects in excalibur, like doing Star Marbles.
You can use the screen texture to do cool things like reflections in the water.
Scene Ergonomics
You can now define scenes up front and get strong typing in addition to addScene(...)
typescript
typescript
Tile Map Plugins
Tiled plugin was completely rewritten and is SO MUCH better, we support nearly every feature of Tiled now!
New LDtk Plugin check out the sample game using the plugin here
New Spritefusion Plugin check out the sample game using the plugin here
Aseprite Plugin
Native .aseprite support iterate on your assets whild you build your game.
typescript
typescript
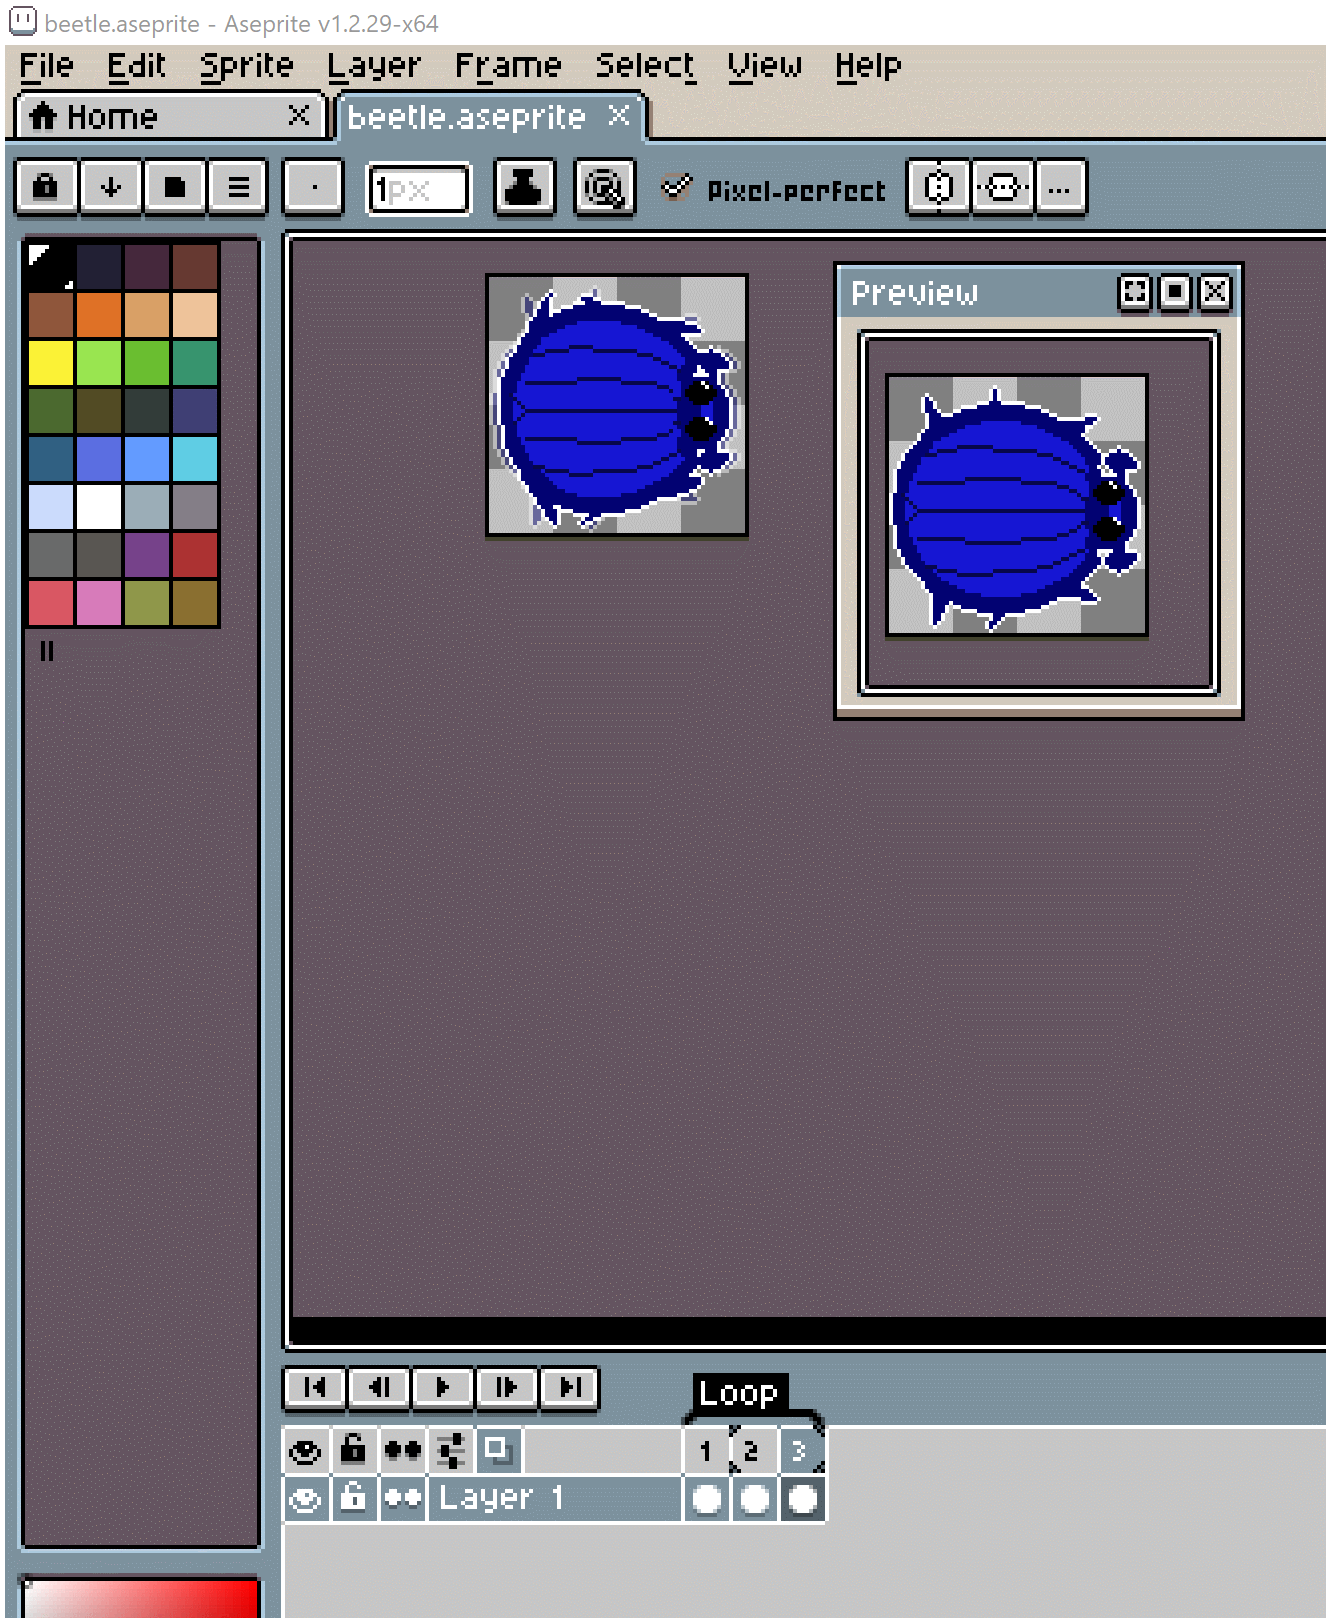
If you're curious about how this was built, we live streamed the process!
Path finding Plugin
Justin put together an official path finding plugin that supports both Djikstra & A*!
You can see the plugin in action in this sample, click to move the little guy around.
JSFXR Plugin
The JSFXR plugin is super useful for creating extra small sounds programmatically instead of downloading large wav/mp3 files!
shell
shell
This allows you to sepcify the config for the audio, which could be changed on the fly as well.
typescript
typescript
Example of how to integrate this into your game
New Tutorial
We have a new tutorial! It's a new flappy bird clone called "Excalibird".
New High Fidelity Samples
- Jelly Jumper by Matt Jennings and the source code
- Sum Monsters and the source code
- Tiny Tactics and the source code
- Excalibird and the source code
Caliburn Games
The core contributors around Excalibur have started a business! We are modeling ourselves off of w4games, providing: educational content, support, project development, and console porting services. Excalibur.js and Excalibur Studio will always be open source.
Our plan for 2025 is to release 2 commercial games on various platforms AND offer Nintendo Switch Console publishing!!!
Visit caliburn.games today and start working with us.
Excaliburjs.TV
We are planning on releasing a number of free and paid courses through Caliburn Games.
Sign up for more details when they become available https://excaliburjs.tv
Near Future
Sound Manager
We are planning on adding a "Sound Manager" to organize sounds into different "tracks" that can be mixed and muted independently. For example sound effects and background music.
Folks have implemented this in almost every game made, so we plan on adding a first party implementation to make this easy.
Collision and Physics
We are planning a number of highly requested improvements to physics and collisions.
- Continuous Collision Improvements
- Swept AABB TOI
- ShapeCasting
- Surface Velocity on bodies (think conveyor belts)
- Arcade Friction
Lighting
The future versions of Excalibur will have lighting features to really enhance your games. Big thanks to Justin for digging in and figuring out our approach here!
The plan is to add spot lights and point lights, under the hood this uses a technique called raymarching.
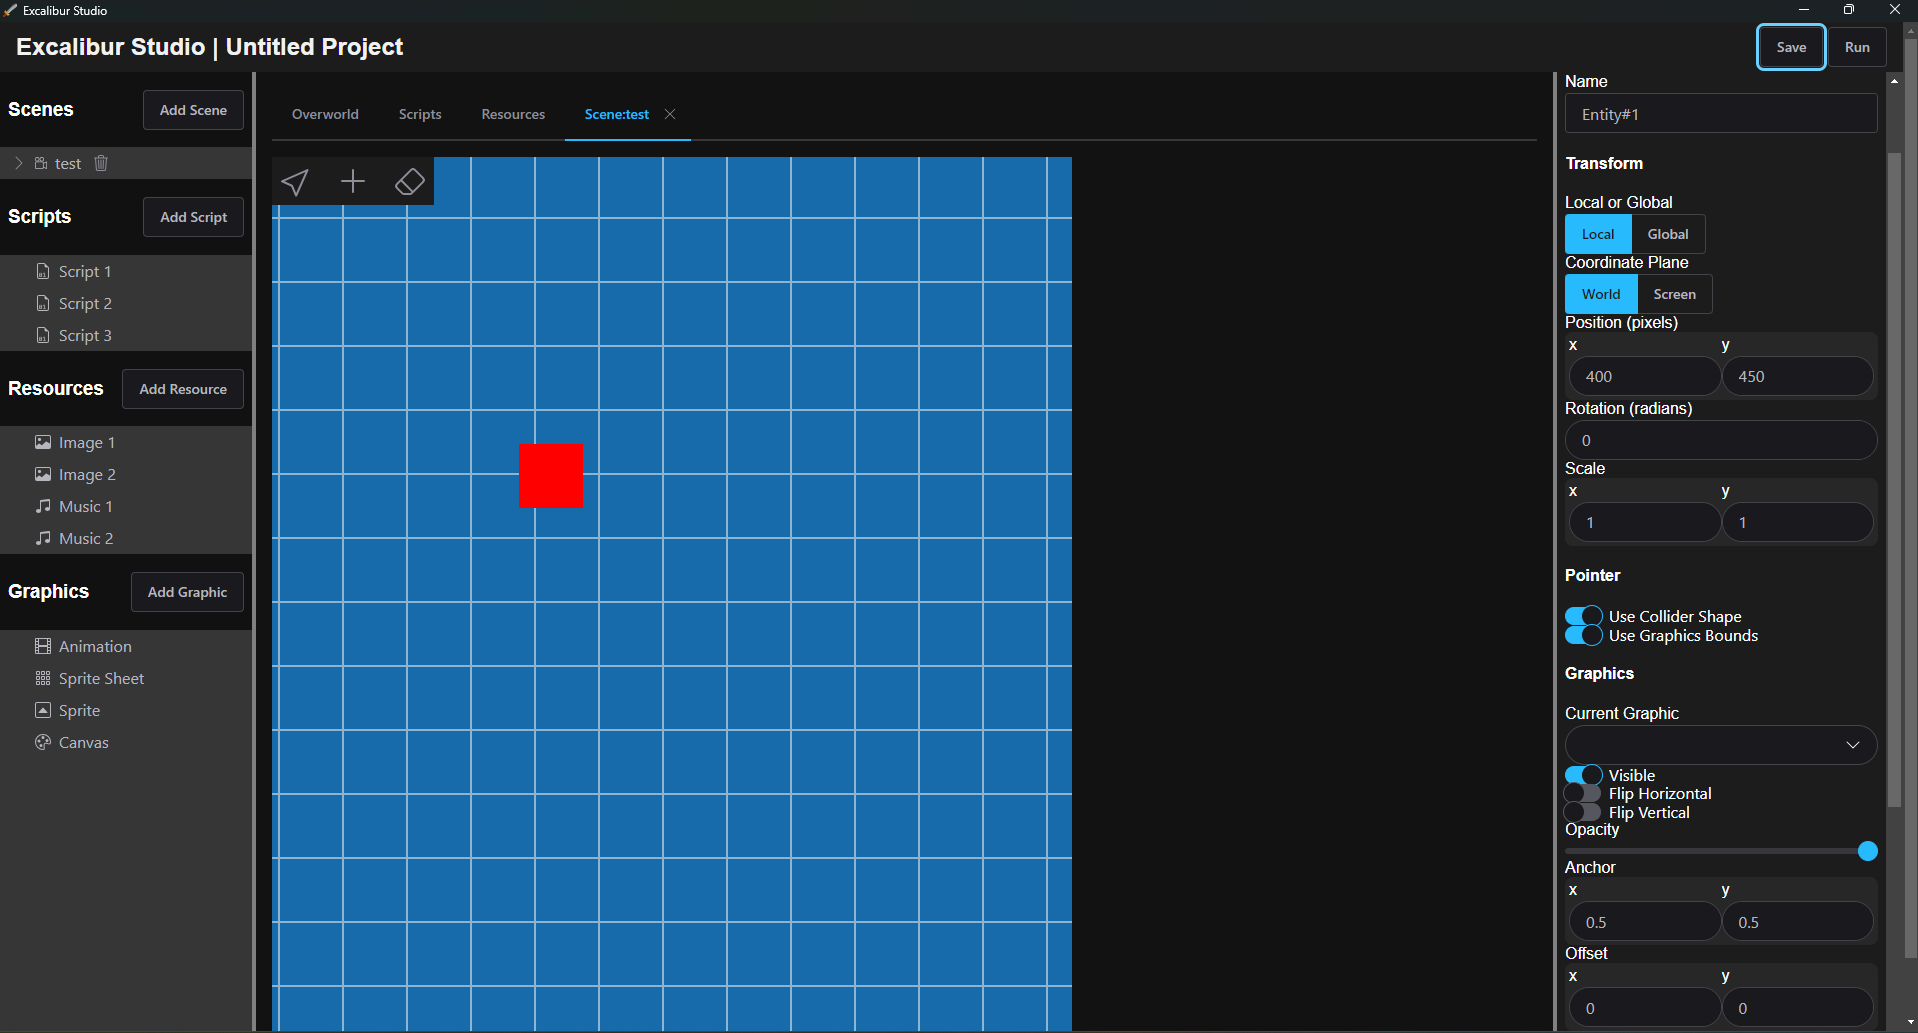
Excalibur Studio
We are working on an open source visual editor for Excalibur, so that folks can drag and drop, design, code, configure games, and export to various platforms!
We'll be opening up the source code as soon as we have something that works for a vertical slice of game dev.
v1.0
The majority of APIs are now stable and not much will change between now and the v1.0 announcement. Right now we are working on adding a couple more features, light refactoring, and cleaning up some edge case bugs.
We expect to be making a v1.0 announcement soon!