As your game grows, so does the complexity of its logic.
Enemies need to react to the player. Animations need to trigger damage. AI systems need to coordinate state changes. UI needs to update
when something happens — but that “something” might come from anywhere.
One approach is direct calls:
ts
enemy.takeDamage(10);
enemy.die();
hud.updateHealth();
sound.play();
ts
enemy.takeDamage(10);
enemy.die();
hud.updateHealth();
sound.play();
This works… until it doesn’t.
Suddenly everything knows about everything else. A small change in one system ripples through your entire codebase. Reuse becomes
difficult. Debugging becomes painful.
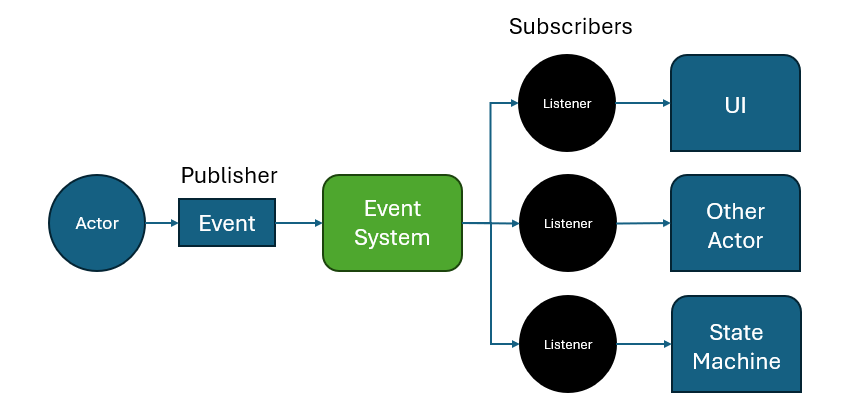
This is where event-driven architecture shines — and ExcaliburJS provides a powerful, flexible event system that can be used as a tool to connect different systems.
In this article, we’ll explore:
What Excalibur’s event framework actually gives you
Why publish/subscribe (pub/sub) patterns matter in games
Practical, real-world use cases
And how to model gameplay events, not just callbacks
Events are a tool. Any tool can help you solve a specific set of problems. As with any other tool, if you start applying this solution
to the wrong problems, there are potential foot-guns. We will discuss this a bit.
Every 2D gamedev knows the pain: you've got a beautiful tilemap, but now you need to add gameplay elements. Where do enemies spawn? Which tiles are collectibles? What triggers that secret door?
The traditional solution? Maintain separate data structures, coordinate systems, and hope they stay in sync with your map. It's tedious, error-prone, and breaks the moment you resize your level.
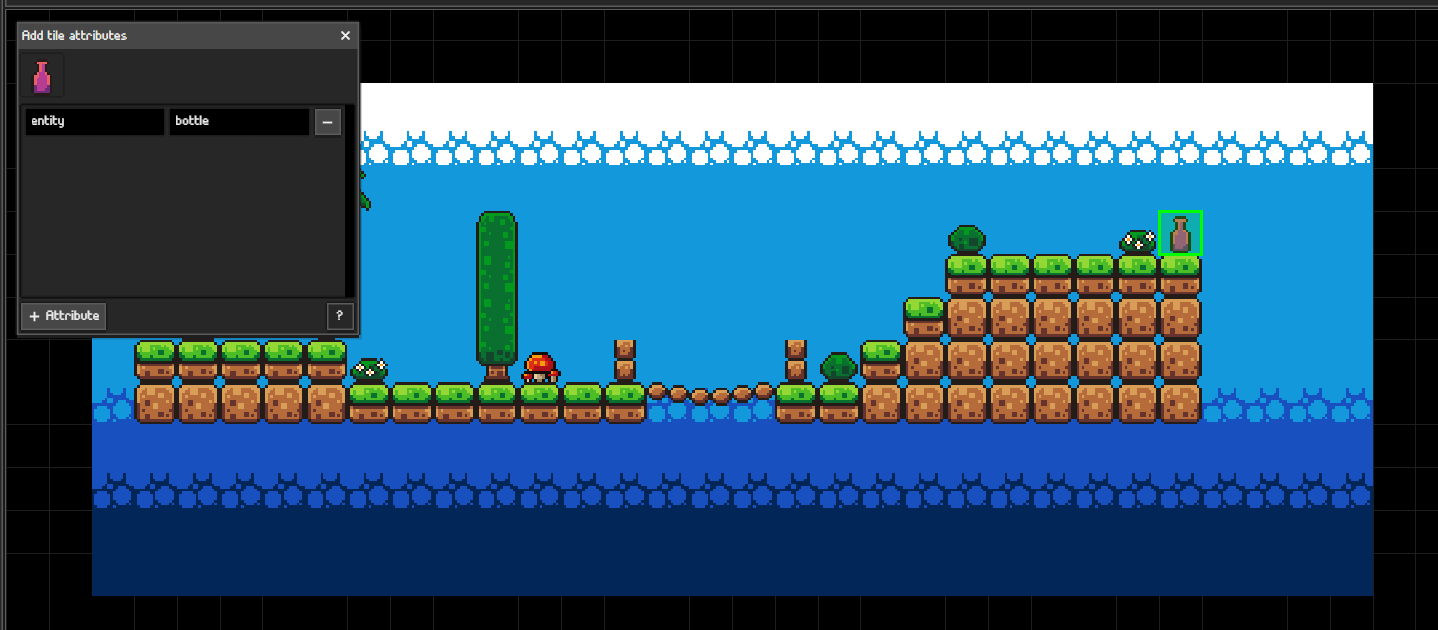
In this post, I'll show you how the SpriteFusion tile attributes feature changes the game. With the updated ExcaliburJS SpriteFusion plugin, you can now embed custom JSON data directly into your tilemap — keeping your logic and layout in perfect harmony.
Small plug for the engine that makes this all possible:
ExcaliburJS is a friendly, TypeScript 2D game engine for the web. It's free and open source (FOSS), well documented, and has a growing community of developers building great games.
The SpriteFusion plugin is just one example of how Excalibur's architecture makes complex features feel natural. If you're interested in 2D web game development, check it out!
Tile attributes bridge the gap between level design and game logic. What used to require maintaining parallel data structures now happens automatically:
Design once — add entities, triggers, and logic directly in SpriteFusion
One source of truth — no more coordinate synchronization
Iterate fast — move things in the editor, not the code
The updated ExcaliburJS SpriteFusion plugin makes this seamless with attribute callbacks and object layers. Your maps become more than just visuals — they're living configuration files for your game world.
Whether you're spawning enemies, placing collectibles, or defining trigger zones, tile attributes keep your workflow smooth and your codebase clean.
Ready to embed game logic in your tilemaps? Give SpriteFusion attributes a try — your future self will thank you when you move that boss fight for the tenth time and everything just works.
Autotiling is one of those topics every 2D gamedev bumps into sooner or later.
You want maps that look nice without hand-placing every edge and corner, but you don’t want to manage a monster tileset with 50+
variants just to blend one terrain type into another.
In this post, I’ll show you the dual Tilemap technique I use in ExcaliburJS with TypeScript.
This method cuts the needed art down to just 5 tiles, keeps your code simple, and separates gameplay logic from visual decoration.
Autotiling is about automating which tile sprite to draw based on a tile’s neighbors.
Instead of painting every edge by hand, the engine checks surrounding cells and picks the right graphic.
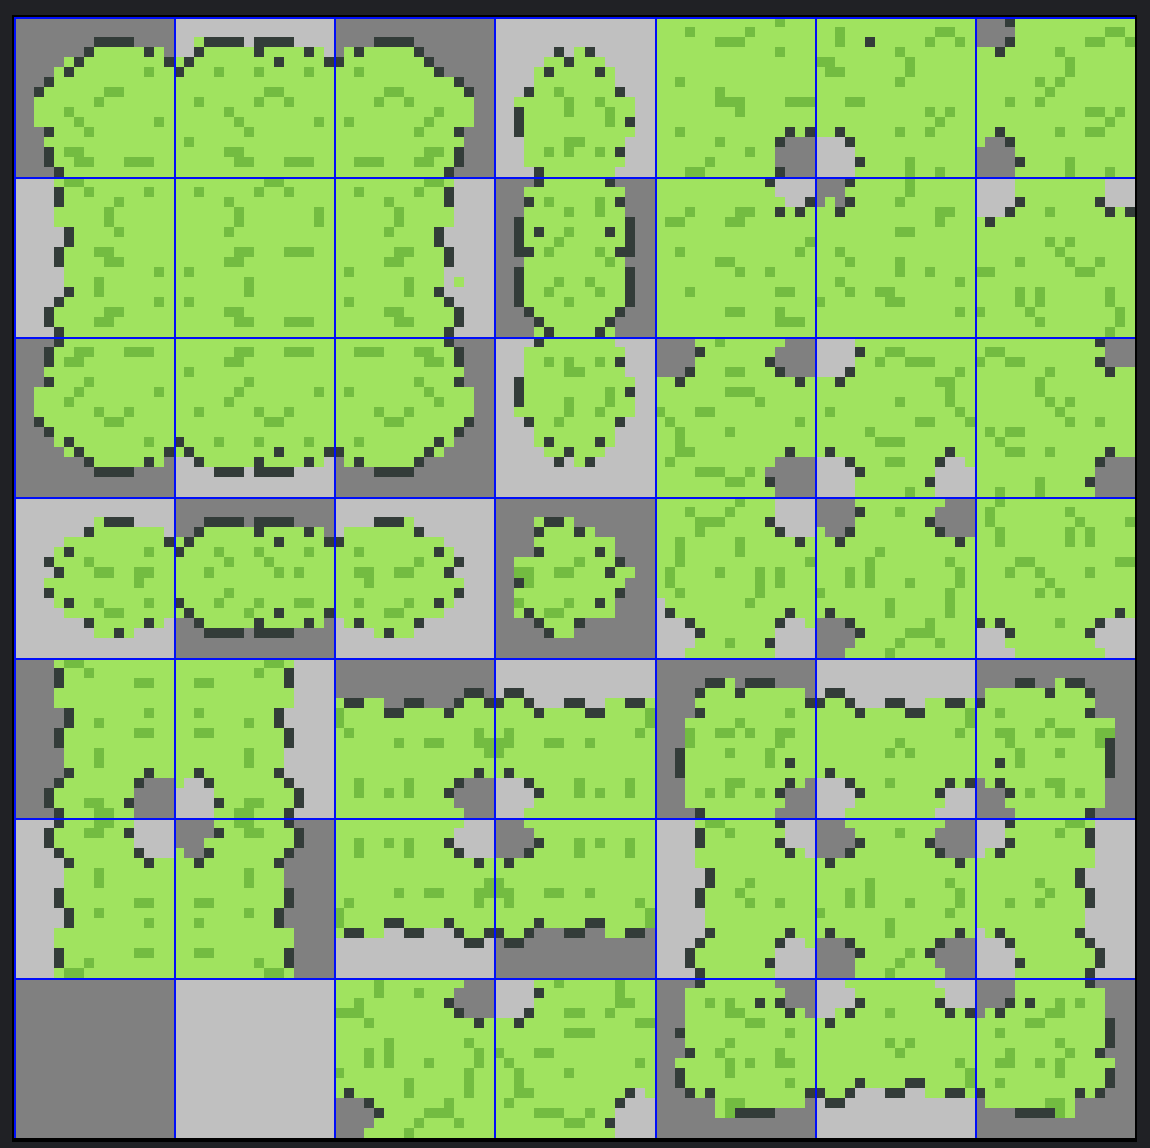
Wang tiles – edges/corners encode transitions; flexible, but still asset-heavy.
These work well but tend to require large tilesets and entangled rules.
My last dive into autotiling, Autotiling Technique, implemented a 47 tile
tileset and bitmasking. While it worked and looked great, the algorithm forced me to do a lot of work mapping all the different
bitmasks to the 47 tiles. It took a lot of manual effort.
The classic techniques all share a common trade-off: flexibility vs. asset count.
Blob / Bitmask (47+ tiles)
Each neighbor contributes to a binary mask (8 bits → 256 possibilities).
Many cases overlap visually, so artists usually trim down to ~47 unique tiles.
This means dozens of sprites to draw and maintain.
Marching Squares (16 tiles)
Simpler 4-bit system that only considers N/E/S/W.
It’s easier to code, but you still need 16 distinct tiles.
Wang Tiles
Encode transitions on edges or corners. Very elegant mathematically, but each terrain type still multiplies your tile count.
These all work — but if you only want a clean outline between Ground and Void, they’re overkill.
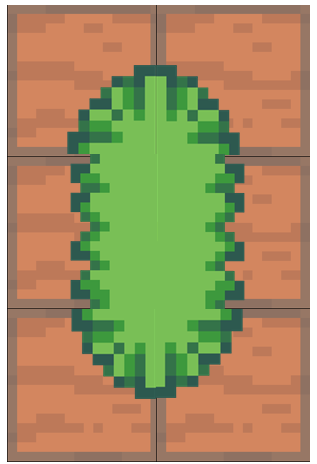
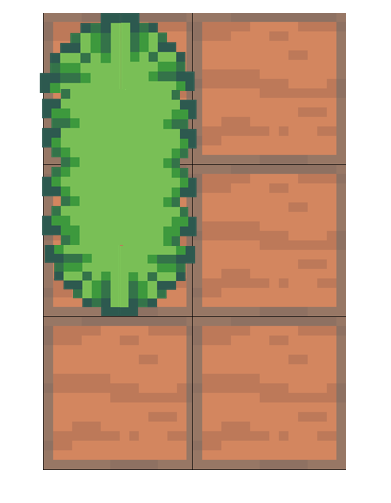
Visual: Part of the tile shows one terrain (e.g., grass), while the rest shows another (e.g., soil/ground).
Gameplay/Logic: The walkable area is determined by the world Tilemap (logic map), not the graphic overlay. So even if half the tile
visually looks like grass, the character might still be able to walk over it if the underlying tile is marked as walkable ground.This
leads to a detail that the game developer must manage: is the tile walkable or usable?
Instead of one giant Tilemap that does everything, we split the work:
World Tilemap (logic)
Just 2 states and one tile: the background tile. This is the world Tilemap and is used for game logic. For this demonstration we
are manage the states of soil or grass.
Graphics Tilemap (overlay)
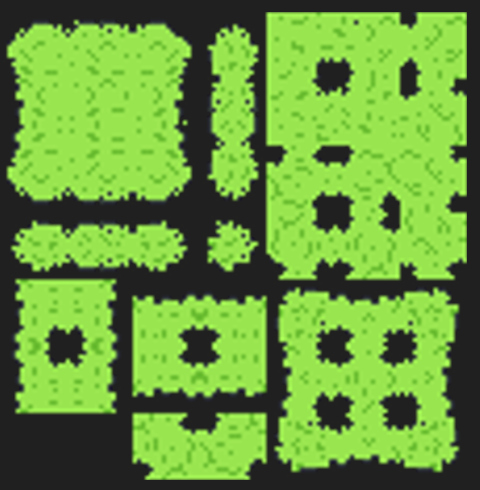
Only 5 tiles: Edge, InnerCorner, OuterCorner, Filled, or Opposite Corners
These can be rotated and stacked to create all the shapes we need.
Total: 6 tiles, the background tile plus 5 different grass tiles.
The tileset i'm using has 6 tiles, the first is the 'base' soil tile that covers the world Tilemap. The next 5 are the 5 tiles needed
for this autotiling technique. For the purposes of this demonstration I included a light border around the soil tile so the end result
can more readily show how the Tilemaps line up.
I loop through all the tiles initially to setup the intial state for each Tilemap.
ts
// Instead of using a TypeScript enum, I like to define my tile states as a const object with string literal values
constTileState= {
soil: "soil",
grass: "grass",
} asconst;
// Setup the world map state
for (consttileof worldMap.tiles) {
tile.addGraphic(tileSS.getSprite(0, 0)); // This sets the default 'soil' tile from the spritesheet
tile.data.set("state", TileState.soil); // This is setting the data store of each tile to 'soil'
}
// Setup the Mesh map state
for (consttileof meshMap.tiles) {
tile.data.set("worldNeighbors", getWorldNeighbors(tile)); // Each tile in the meshMap needs to know its corresponding 'worldMap' neighbors, 4 for each tile (TL, TR, BL, BR)
tile.data.set("meshTile", null); // which index of the spritesheet do I access
tile.data.set("rotation", 0); // how do I rotate the graphic
}
ts
// Instead of using a TypeScript enum, I like to define my tile states as a const object with string literal values
constTileState= {
soil: "soil",
grass: "grass",
} asconst;
// Setup the world map state
for (consttileof worldMap.tiles) {
tile.addGraphic(tileSS.getSprite(0, 0)); // This sets the default 'soil' tile from the spritesheet
tile.data.set("state", TileState.soil); // This is setting the data store of each tile to 'soil'
}
// Setup the Mesh map state
for (consttileof meshMap.tiles) {
tile.data.set("worldNeighbors", getWorldNeighbors(tile)); // Each tile in the meshMap needs to know its corresponding 'worldMap' neighbors, 4 for each tile (TL, TR, BL, BR)
tile.data.set("meshTile", null); // which index of the spritesheet do I access
tile.data.set("rotation", 0); // how do I rotate the graphic
It is important to understand how I approached storing the tile map data. My disclaimer: there is more than one right way to do this,
and I'm certain there are more optimum means. This is simply my approach.
Not every tile will have 4 neighbors, if you consider the edge of the worldMap, there may only be one or two neighbors available which
is why I allow undefined values for the tile positions as well. The majority of the tiles can/will be surrounded by 4 world tiles. The
fact that the mesh Tilemap is offset by half of the tilesize, means that the corners of the mesh tile land on the centers of the four
neighbors, and I use this to my advantage.
While not specific to Tilemapping, controlling the mouse properly to set the worldMap tile states is important. When I click and drag
the mouse, what I'm doing is using the mouse pointer positions to set/clear the world tile state. I use the Left Mouse Button (LMB) to
set 'grass' state, and use the Right Mouse Button to clear the 'grass' state to 'soil'.
ts
let isDragging =false;
let lastTile:Tile|null=null;
let activeButton:PointerButton|null=null;
game.input.pointers.primary.on("down", e=> {
if (e.button !== PointerButton.Left && e.button !== PointerButton.Right) return; // ignore other buttons
activeButton = e.button;
isDragging =true;
lastTile =null; // reset so first tile definitely triggers
As the mouse moves with the LMB or RMB held down, the setTileState method is being called with the position and button state details.
This method uses this data to set the worldMap tile states appropriately. Then redraws the Tilemap.
The Magic, selecting which tile and how to rotate
For this section, this is where one had to sit down and consider how each tile is drawn. This is my approach;
Loop over world neighbors and 'count' grass tiles
For each 'combination' of grass tiles, select the tile index
For the couple of tiles where rotation is important, figure out 'where' the grass tiles are located
const { spriteIndex, rotation } =calculateMeshSprite(worldNeighbors); // call the function that returns the index and rotation structure
// if no tile data needed, clear out the mesh data
if (spriteIndex ===null|| rotation ===null) {
tile.data.delete("meshTile");
tile.data.delete("rotation");
continue;
}
// set the mesh data appropriately
tile.data.set("meshTile", spriteIndex);
tile.data.set("rotation", toRadians(rotation)); // this is where the rotation is converted to Radians for proper graphic rotation
}
};
This is a straightforward utility method that loops through each tile and sets the data appropriately, there's still one more magical
method to dive into.
let isTLGrass = neighbors.TL?.data.get("state") === TileState.grass;
let isTRGrass = neighbors.TR?.data.get("state") === TileState.grass;
let isBLGrass = neighbors.BL?.data.get("state") === TileState.grass;
let isBRGrass = neighbors.BR?.data.get("state") === TileState.grass;
...
So far in this function we've looped through the neighbors object and counted the grass tiles. Also, I've setup some helper flags for
assisting with orientation.
ts
...
// No grass, return the nullish state
if (grassCount ===0) return { spriteIndex: null, rotation: null };
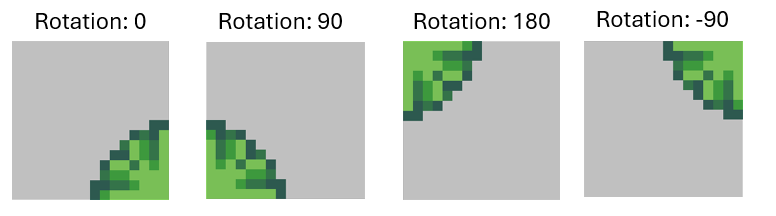
// one grass square, use the sprite with just a corner piece, index 1
elseif (grassCount ===1) {
spriteIndex =1;
//rotate the tile based on which of the corners is grass
if (isTLGrass) {
rotation =180;
} elseif (isTRGrass) {
rotation =-90;
} elseif (isBLGrass) {
rotation =90;
} elseif (isBRGrass) {
rotation =0;
}
}
...
ts
...
// No grass, return the nullish state
if (grassCount ===0) return { spriteIndex: null, rotation: null };
// one grass square, use the sprite with just a corner piece, index 1
elseif (grassCount ===1) {
spriteIndex =1;
//rotate the tile based on which of the corners is grass
if (isTLGrass) {
rotation =180;
} elseif (isTRGrass) {
rotation =-90;
} elseif (isBLGrass) {
rotation =90;
} elseif (isBRGrass) {
rotation =0;
}
}
...
The grassCount: 0 scenario is super simple, return nulls so that nothing is drawn. But let us look into the grassCount:1 quick to get
an ideas of what we are working with.
We can use the utility flags for us to set the appropriate rotations, and you can see this pattern show up in the next two scenarios as
well. I won't draw the permutations but the commens walk you through each situation.
Below both 2 grass tile and 3 grass tile scenarios. The 3 grass tile scenario it just seemed easier to me to track which tile was not a
grass tile.
ts
...
// two of the neighbors are grass, that could be two different tile indexes possibly
elseif (grassCount ===2) {
// are they next to each other or cattycorner?
// first four are when they are next to each other
if (isTLGrass && isTRGrass) {
spriteIndex =2;
rotation =-90;
} elseif (isTLGrass && isBLGrass) {
spriteIndex =2;
rotation =180;
} elseif (isTRGrass && isBRGrass) {
spriteIndex =2;
rotation =0;
} elseif (isBLGrass && isBRGrass) {
spriteIndex =2;
rotation =90;
}
// next two are the 2 catty corner conditions
elseif (isTLGrass && isBRGrass) {
spriteIndex =3;
rotation =90;
} elseif (isTRGrass && isBLGrass) {
spriteIndex =3;
rotation =0;
}
}
// three grass, one soil, let's track the soil tile, its just easier
elseif (grassCount ===3) {
spriteIndex =4;
// to note, we're specifically looking for the tile that's NOT grass
if (!isTLGrass) {
rotation =0;
} elseif (!isTRGrass) {
rotation =90;
} elseif (!isBLGrass) {
rotation =-90;
} elseif (!isBRGrass) {
rotation =180;
}
}
// all grass tiles, rotation is irrelevant
elseif (grassCount ===4) spriteIndex =5;
return { spriteIndex, rotation };
};
ts
...
// two of the neighbors are grass, that could be two different tile indexes possibly
elseif (grassCount ===2) {
// are they next to each other or cattycorner?
// first four are when they are next to each other
if (isTLGrass && isTRGrass) {
spriteIndex =2;
rotation =-90;
} elseif (isTLGrass && isBLGrass) {
spriteIndex =2;
rotation =180;
} elseif (isTRGrass && isBRGrass) {
spriteIndex =2;
rotation =0;
} elseif (isBLGrass && isBRGrass) {
spriteIndex =2;
rotation =90;
}
// next two are the 2 catty corner conditions
elseif (isTLGrass && isBRGrass) {
spriteIndex =3;
rotation =90;
} elseif (isTRGrass && isBLGrass) {
spriteIndex =3;
rotation =0;
}
}
// three grass, one soil, let's track the soil tile, its just easier
elseif (grassCount ===3) {
spriteIndex =4;
// to note, we're specifically looking for the tile that's NOT grass
// if there is tile data, grab appropriate sprite, and rotate it
let sprite = tileSS.getSprite(spriteIndex, 0);
let spritecopy = sprite.clone(); // <------ if you don't create a copy of the sprite, you'll end up rotating ALL of them in the Tilemap
spritecopy.rotation = rotation;
tile.addGraphic(spritecopy); // draw the graphic
}
};
ts
constredrawMeshTileMap= () => {
let tileindex =0;
for (consttileof meshMap.tiles) {
// clear current tile graphics
tile.clearGraphics();
//grab sprite index and rotation
constspriteIndex= tile.data.get("meshTile");
constrotation= tile.data.get("rotation");
tileindex++;
// no sprite data, move on to next tile
if (!spriteIndex) continue;
// if there is tile data, grab appropriate sprite, and rotate it
let sprite = tileSS.getSprite(spriteIndex, 0);
let spritecopy = sprite.clone(); // <------ if you don't create a copy of the sprite, you'll end up rotating ALL of them in the Tilemap
spritecopy.rotation = rotation;
tile.addGraphic(spritecopy); // draw the graphic
}
};
The final thing left to do is simply managing the 'drawing' of the graphics to each tile location. We do this by looping through the
mesh tiles, and if there is data present, redraw it to the tile.
ExcaliburJS is a friendly, TypeScript 2D game engine that can produce games for the web. It is free and
open source (FOSS), well documented, and has a growing, healthy community of gamedevs working with it and supporting each other. There
is a great discord channel for it JOIN HERE, for questions and inquiries. Check it out!!!
Autotiling is one of those problems that looks simple but can quickly balloon into complexity — traditional methods often demand dozens
of tiles and intricate bitmask rules.
By splitting responsibilities between two Tilemaps, we drastically simplify the workflow:
World map handles logic with just 2 states (soil, grass) and a base tile graphic.
Graphics map overlays visuals with only 5 tiles.
Total: 5 tiles instead of 47+.
The dual Tilemap method keeps your code clean, your art requirements minimal, and your system flexible for new biomes or mechanics.
If you want to dig into the details, check out the demo on Itch.io and the
source on GitHub.
It’s a simple idea that pays off big when your worlds start to grow.
As a game developer, if the thought of hand crafting a level does not appeal to you, then you may consider looking into procedural
generation for your next project. Even using procedural generation, however, you still need to be able to turn your generated map
arrays into a tilemap with clean, contiguous walls, and sprites that match up cleanly, as if it was drawn by hand. This is where a
technique called auto-tiling can come into play to help determine which tiles should be drawn in which locations on your tilemap.
In this article, I will explain the concept of auto-tiling, Wang Tiles, binary and
bitmasks, and then walk through the process and algorithms associated with using
this tool in a project.
Auto-tiling converts a matrix or array of
information about a map and assigns the corresponding tile texture to each tile in a manner that makes sense visually for the tilemap
level. This uses a tile's position, relative to its neighbor tiles to determine which tile sprite should be used. Today we will focus
on bitmask encoding neighbor data, although there are other techniques that can be used to accomplish this.
One can get exposed to auto-tiling in different implementations. If you're using a game engine like Unity or
Godot, there are features automatically built into those packages to enabling auto-tiling as you draw and
create your levels. Also, there are software tools like Tiled, LDTK, and
Sprite Fusion, that are a little more tilemap specific and give you native tools for auto-tiling.
Auto-tiling has provided the most benefit when we think about how we can pivot from tilemap matrices or flat indexes representing the
state of a tilemap, to a rendered map on the screen. Let us say you have a tilemap in the form of a 2d matrix with 1's and 0's in it
representing the 'walkable' state of a tile. Let us assign a tile as a floor (0) piece or a wall (1) piece. Now, one can simply use two
different tiles, for example:
a grass tile and a dirt path tile
We could take a tilemap matrix like this:
and use these two tiles to assign the grass to the 1's and the 0's to the path tile. It would look like this:
This is technically a tile-map which has been auto-tiled, but we can do a little better.
Wang tiles do not belong or associate with game development or tile-sets specifically, but come from mathematics. So, why are we
talking about them? The purpose of the Wang tiles within the scope of game development is to have a series of tile edges that create
matching patterns to other tiles. We control which tiles are used by assigning a unique set of bitmasks to each tile that allows us
reference them later.
Wang tiles themselves are a class of system which can be modeled visually by square tiles with a color on each side. The tiles can be
copied and arranged side by side with matching edges to form a pattern. Wang tile-sets or Wang 'Blob' tiles are named after Hao Wang, a
mathematician in the 1960's who theorized that a finite set of tiles, whose sides matched up with other tiles, would ultimately form a
repeating or periodic pattern. This was later to be proven false by one of his students. This is a massive oversimplification of Wang's
work, for more information on the backstory of Wang tiles you can be read here: Wang Tiles.
This concept of matching tile edges to a pattern can be used for a game's tilemap. One way we can implement Wang tiles in game
development is to create levels from the tiles. We start with a tile-set that represents all the possible edge outcomes for any tile.
The numbers on each tile represents the bitmask value for that particular permutation of tile design. We then can see how you can swap
these tiles for a separate texture below. In the image above, there are a couple duplicate tile configurations, and they are shown in
white font.
The magic of Wang tiles is that it can be extended out and create unique patterns that visually work. For example:
A bitmask is a binary representation of some pattern. In the scope of this conversation, we will use a bitmask to represent the 8
neighbors tiles of an given tile on a tilemap.
A bitmask is a binary representation of some pattern. In the scope of this conversation, we will use a bitmask to represent the 8
neighbors tiles of an given tile on a tilemap.
So our normal counting format is designed as base-10. This means that each digit in our number system represents digits 0-9 (10
digits), and the value of each place value increases in power of base 10.
So in the number '42', the 2 represents - (2 * 100) which is added to the 4 in the 'tens' place, which is (4 *
101), which equals 42.
(2 * 1) + (4 * 10) = 42
(2 * 1) + (4 * 10) = 42
T This in binary looks different, as binary is base-2, which means that each digit position has digits 0 and 1, (2 digits). This is the
counting system and 'language' of computers and processors.
Quickly, let's re-assess the previous example of '42'. 42 in binary is 101010. Let's break this down in similar fashion.
Starting from the right placeholder and working our way left... The 0 in the right most digit represents 0 * 20. The next
digit represents 1 * 21... and on for each digit and the exponent increases each placeholder.
That is how information in computers is encoded. We can use this 'encoding' scheme to easily represent binary information, like 'on' or
'off', or in this discussion, walkable tile or not walkable. This is why in the tile-set matrix example above, we can flag non-walkable
tiles as '1', and walkable tiles as '0'. This is now binary encoded.
A bit is one of these placeholders, or one digit. 8 of this bits together is a byte. Computers and processors, at a minimum, read at
least a byte at a time.
We can use this binary encoding for the auto-tiling by representing the state of each of a tile's neighbors into 8 bits, one for each
neighbor. This means that the condition and status of each neighbor for a tile can be encoded into one byte of data (8 bits) and CAN be
represented with a decimal value, see my earlier explanation about how the number 42 is represented in binary.
So the whole point of this section is to get to this example: we are going to encode the neighbor's data for an example tile.
Now the tile we are assigning the bitmask to is the green, center tile. This tile has 8 neighbors. If I start reading the 1's and 0's
from the top left and reading right, then down, I can get the value: 101 (top row) - 01 (middle row) - 101 (bottom row). Remember to
skip the green tile.
All together, this is 10101101, which can be stored as a binary value, which can be converted to a decimal value: 173. Remember to
start at the rightmost bit when converting.
Now we can use that decimal value of 173 to represent the neighbor pattern for that tile. Every tile in a tilemap, can be encoded with
their 'neighbors' bitmasks.
As you saw earlier, the wang tiles had bitmask values assigned to them. This is how we know which tile to substitute for each bitmask.
We have already covered the hard part. In this section we are pulling it all together in a walkthrough of the overall high level
process.
Here are the steps we are covering:
Find or create a tile-set spritesheet that you would like to use Create your tilemap data, however you like. Loop through each index of
tile, and evaluate the neighbor tiles, and assign bitmask Map the bitmap values to the 'appropriate' tile in your tile-set (this is the
long/boring part IMO) Iterate over each tile and assign the correct image that matches the bitmask value Draw your tilemap in your game
Creating a tile-set Here is an example of a tile-set that I drew for the demo project.
These 47 tiles represent all the different 'wall' formations that would be required. I kept my floor tiles separate in a different file
so that it is easier to swap out. The floor is drawn as a separate tile underneath the wall. Each tile represented in the grid is
designed to match up with a specific group of neighbor patterns. Let's take the top-left tile:
This tile is intended to be mapped to a tile where there are walled neighbors on the right, below, and bottom right of the tile in
question. There maybe a few neighbor combinations ultimately that may be mapped to this tile, in my project I found 7 combinations that
this tile configuration would be mapped to.
If you look through each tile you can see how it 'matches' up with another mating tile or tiles in the map. For my implementation, I
spent time testing out each configuration visually to see which tile different bitmasks needed to be mapped to.
Now we will use either a 2d matrix or a flat array in your codebase, with each index representing a tile. I use a flat array, with a
tilemap width and height parameter. It is simply preference.
You can manually set these values in your array, or you can use a procedural generation algorithm to determine what your wall and floor
tiles. I can recommend my Cellular Automata aarticle that I wrote earlier if you
are interested in generating the tilemap procedurally. When this is completed, you'll have a data set that will look something like
this.
For each index of your array, you will need to capture all the states of the neighbor tiles for each tile, and record that value on
each tile. I would refer to the previous section regarding how to calculate the bitmasks.
Map bitmask values to each tile sprite in spritesheet
Here is the monotonous part. For a byte, or an 8-bit word, the amount of permutations of tile patterns is 256. That's a lot of
mappings. Now I did mine the hard way, manually, one by one. But there may be easier ways to do this. I use Typescript, so I will share
a bit of what my mappings look like. Each number key in the object is the bitmask value, and its mapped to a coordinate array [x, y]
for my spritesheet that I shared earlier in the article. Now, I could have put them in order, but that does not really serve any
benefit.
The last two steps we'll do together. Now we simply need to iterate over our tilemap, assign the appropriate sprite tiles. I'm using
Excalibur.js for my game engine, and the code is in Typescript, but you can use whichever tool you would prefer.
ts
draw(): TileMap {
// call the method that loops through and configures all the bitmasks
let bitmask =this.createTileMapBitmasks(this.map);
let tileindex =0;
for (consttileofthis.map.tiles) {
tile.clearGraphics();
// if the tile is solid, draw the base tile first, THEN the foreground tile
if (tile.data.get("solid") ===true) {
// add floor tile
tile.addGraphic(this.baseTile);
// using the tile's index grab the bitmask value
let thisTileBitmask = bitmask[tileindex];
// this is the magic... grab the coordinates of the tile sprite from tilebitmask, and provide that to Excalibur
In this demo application, I'm using Excalibur.js engine to show how auto-tiling can work, and its benefits in game development. The
user can click on the tilemap to draw walkable paths onto the canvas. As the walkable paths are drawn, the auto-tiling algorithm will
automatically place the correct tile in its position based on the neighbor tile's walkable status.
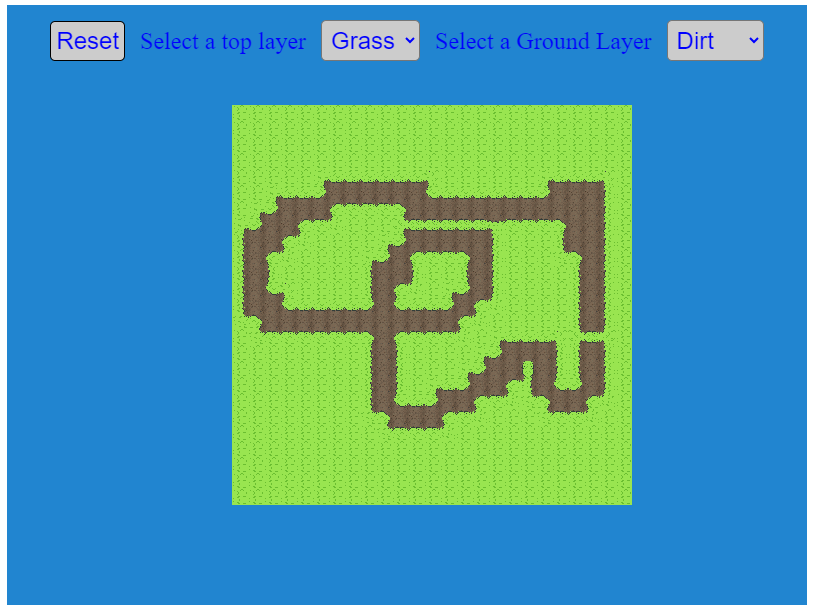
There are some controls at the top of this app, a button to reset the tilemap settings back to not walkable, so one can start over.
Also, two drop downs that let the user swap out tile-sets for different styles. This shows the benefits of having standardized Wang
tiles for your tile-sets. For example, in this demo, we have three Wang tile-sets. When you swap them out, it can automatically draw
them correctly into your tilemap.
Grass
Snow
and Rock
Why Excalibur
Small Plug...
ExcaliburJS is a friendly, TypeScript 2D game engine that can produce games for the web. It is free and
open source (FOSS), well documented, and has a growing, healthy community of gamedevs working with it and supporting each other. There
is a great discord channel for it JOIN HERE, for questions and inquiries. Check it out!!!
Conclusions
TThat was quite a bit, no? We covered the concept of Autotiling as a tool you can use in game developement. We discussed the benefits
of Wang tiles for your projects and that they allow for the auto selection of the correct tile sprites to use based off of bitmask
assignments. We dug into bitmask and base-2 binary encoding a little bit just to show how we were encoding the neighbor tile
information into a decimal value so we could map the tile sprites appropriately. We finished this portion by doing an example tile
encoding of neighbors to demonstrate the process.
We went step by step throught he process of autotiling, looking at tilesets, looking at code snippets, and finishing at the demo
application on itch. I hope you enjoyed this take on autotiling, as mentioned above, this is NOT the only way to do this, there are
other ways of accomplishing the same effect. You also can tweak this to your own liking, for instance, you can introduce varying tiles
so you can use different floor tiles, or adding decord on to walls to add additional variety and add a feeling of greater immersion
into the worlds your building. Have fun!
I love procedural generation. As a hobbyist game developer, it is the concept and technique that I keep reaching for in my games. This article is about Cellular Automata, which follows suit of my previous articles regarding other procedural generation strategies for game development. In my last article, we studied the Wave Function Collapse Algorithm. Staying within that topical thread of procedural algorithms which can be leveraged in game development, let's turn our focus to Cellular Automata.
Cellular Automata, or CA for short, is an algorithm which has some key potential benefits within the field of game development. You may
have seen in certain games, for example Dwarf Fortress or Terraria for example, where organic looking caves are generated, or some map
patterns that look naturally grown. Essentially, it uses a grid based data set, and for each discrete unit in that grid, uses the state
of all its neighbors to determine the end state of that cell in the ending simulation result.
The early beginnings of the algorithm originated in the 1940's while scientists were studying crystal growth. That study, plus others
including self-replicating robot experiments led to the realization of using a method of treating a system as a collection of discrete
units (cells), and calculating their behavior based on the influence of each cell's neighbors. For more details on this:
Cellular Automata
In the 1970's, James Conway famously created a simulation called the Game of Life. This very simple simulation, which had only four rules, created
a very dynamic and varied group of results that bounced between appearing random and controlled order. The rules determined each cell's future state as classified as dying due to underpopulation or overpopulation, creating a new living unit due to reproduction, or just
continuing to exist with the correct balance of population around that unit.
There are some common implementations of using Cellular Automata in game development. The classic trope is using the CA algorithm for
generating tilemaps of organic looking areas or cave systems.
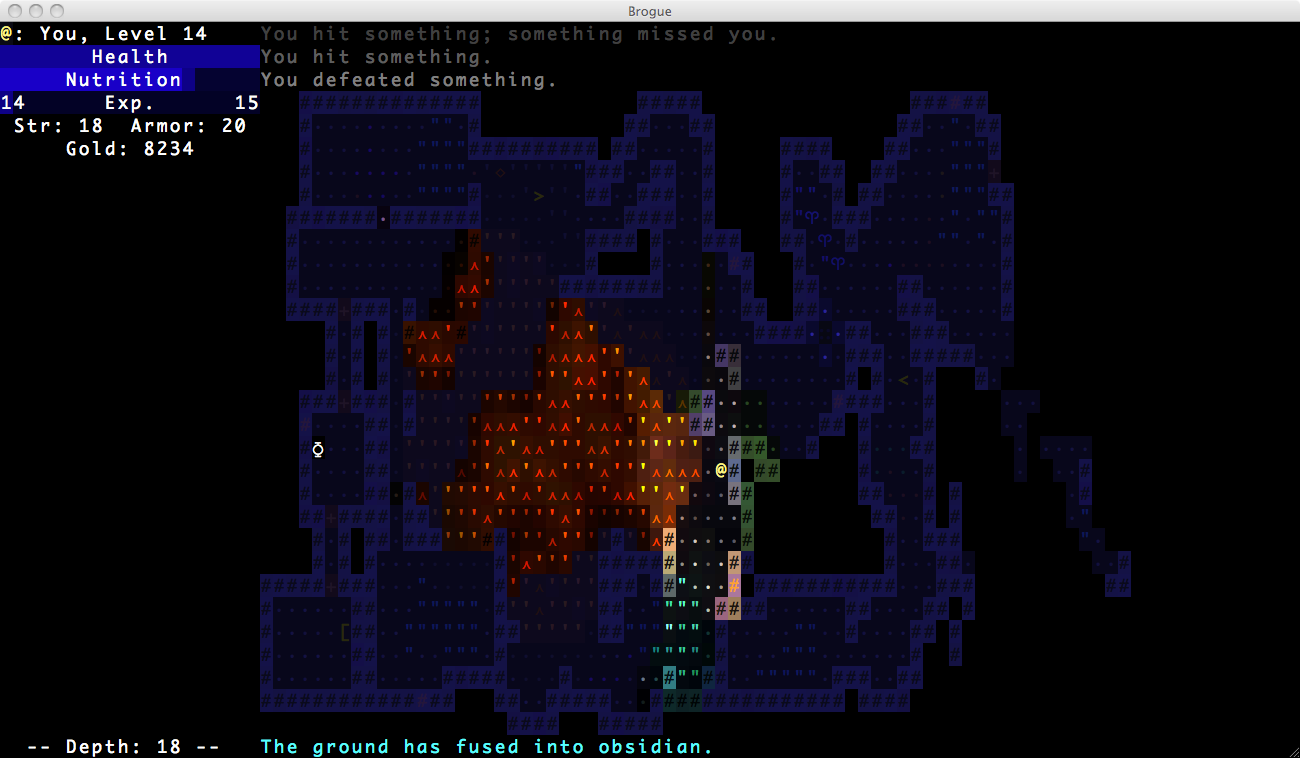
Another application is simulating the spread of fire across an area. Brogue is a good example of how this can be used.
Other aspects is simulating gas expansion in an area, or the spread of a virus, or enemy reproduction simulations for generating new
enemies.
For explaining the CA algorithm, we will demonstrate code snippets that demonstrate TypeScript and using Excalibur.js, but this can be done in any languages and framework of your choice.
The algorithm will have us walk through the grid tile by tile and we will either leave the one or zero in place, or we will flip that value to the opposite, meaning a zero will become a one, and vice versa. The results of this assessment needs to be kept in a new or cloned array, as to not overwrite the starting array's values as you iterate over the tiles.
The rules around flipping the values in each cell will depend on each implementation of the CA algorithm. These can be variable rules, each implementation can be unique in that instance. This gives you some agency and control over how you want your simulation to run. I've tailored this function with the flexibility to pass in the rules on each iteration. The rules are regarding how to handle out of bounds indexes, and what cutoff points are being used.
ts
// Defining our CA function, passing in the grid, dimensions, and rules for OOB indexes and cutoff points
exportfunctionapplyCellularAutomataRules(
map:number[],
width:number,
height:number,
oob:string|undefined,
cutoff0:number|undefined,
cutoff1:number|undefined
):number[] {
constnewMap=newArray(width * height).fill(0);
let zeroLimit =4;
if (cutoff0) zeroLimit = cutoff0 +1; //this creates the less than effect
let oneLimit =5;
if (cutoff1) oneLimit = cutoff1; // this creates the greater than or equalto
for (let i =0; i < height * width; i++) {
for (let x =0; x < width; x++) {
constwallCount=countAdjacentWalls(map, width, height, i, oob); //counts walls in neighbors
if (map[i] ===1) {
if (wallCount < zeroLimit) {
newMap[i] =0; // Change to floor if there are less than cuttoff0 adjacent walls
} else {
newMap[i] =1; // Remain wall
}
} else {
if (wallCount >= oneLimit) {
newMap[i] =1; // Change to wall if there are cutoff1 or more adjacent walls
} else {
newMap[i] =0; // Remain floor
}
}
}
}
return newMap;
}
ts
// Defining our CA function, passing in the grid, dimensions, and rules for OOB indexes and cutoff points
exportfunctionapplyCellularAutomataRules(
map:number[],
width:number,
height:number,
oob:string|undefined,
cutoff0:number|undefined,
cutoff1:number|undefined
):number[] {
constnewMap=newArray(width * height).fill(0);
let zeroLimit =4;
if (cutoff0) zeroLimit = cutoff0 +1; //this creates the less than effect
let oneLimit =5;
if (cutoff1) oneLimit = cutoff1; // this creates the greater than or equalto
for (let i =0; i < height * width; i++) {
for (let x =0; x < width; x++) {
constwallCount=countAdjacentWalls(map, width, height, i, oob); //counts walls in neighbors
if (map[i] ===1) {
if (wallCount < zeroLimit) {
newMap[i] =0; // Change to floor if there are less than cuttoff0 adjacent walls
} else {
newMap[i] =1; // Remain wall
}
} else {
if (wallCount >= oneLimit) {
newMap[i] =1; // Change to wall if there are cutoff1 or more adjacent walls
} else {
newMap[i] =0; // Remain floor
}
}
}
}
return newMap;
}
To note, this approach to the CA algorithm is for the sake of THIS article. Other approaches can be implemented. Let's define our rules for the scope of this article.
If the starting value for a tile is a zero, then to flip it to a one, the neighbors must have five or more ones surrounding the starting tile.
If the starting value for a tile is a one, then to flip it to a zero, the neighbors must have three or fewer ones surrounding the starting tile.
For tiles on the edges of the grid, which will not have 8 neighbors, out of bound regions will be treated as ones or 'walls'
With these rules in place, which can be modified and tailored to your liking, we can use them to determine the next iteration of the grid by going tile by tile and setting the new grid's values based on each tile's neighbors.
For the rule on out of bound neighbors, you can use a variety of different rules to your liking. You can treat them as constants, like in this instance, we treat them as walls. You can have them be treated as floors, which will change how your simulation runs, producing a more 'open' result. You can also have the out of bound tiles mirror the value of the starting value, i.e. if your starting tile on the edge is a one, then out of bound tiles are all ones, and vice versa.
ts
// This function takes in the grid and dims, which index is being inspected, and the rules on OOB tiles
// The 4 types of rules provided are for constant values, floor and wall, random
// , and mirror
case"floor":
break;
case"wall":
count++;
break;
case"random":
let coinflip =Math.random();
if (coinflip >0.5) count++;
break;
case"mirror":
if (map[index]==1) count++;
break;
default:
count++; // Perceive out of bounds as wall
break;
}
}
}
}
return count;
}
So starting at the first tile of the grid, you will look at the eight neighbors of the tile, in this instance, five of them are out of bound indexes. You add all the walls up in the neighbors,since the starting value is a zero, if the value is greater or equal to five, in the new grid/array, you will place a one in index zero for the new grid. This is how you flip the values. If, for instance, there would be less than five walls for the neighbors of this index, the value would have remained zero. You repeat this process for each
tile in the grid/array.
At the end, when you have completely iterated over each tile, you will have a new grid of tiles that are now set to zeroes or ones, based on that starting array. You can use this new grid as a completed result, or you can re-run the same simulation using this new grid as your 'new' starting array of data.
ts
// function that clears out the existing Tilemap and redraws it based on the new returned tile array
This walkthrough will simply use an array of numbers. With this array of numbers we will use a noise field, to represent random
starting values, and then we will utilize the CA algorithm over multiple steps to highlight how it can be utilized.
Let's start with an empty array of numbers. We will represent the flat array as a two dimensional grid, with x and y coordinates. This is a 7 x 7 grid, which will be an array of forty-nine cells. As we process throught he CA algorithm, we will be recording our results
into a new array, as to not overwrite the input array while we are iterating over the indexes.
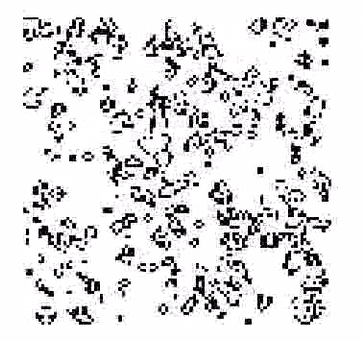
For the CA algorithm, it is suggested to fill the initial array with random ones and zeroes. You can use a Perlin noise field, or a Simplex noise
field or just use your languages built in random function to fill the field. Here is ours:
Now we start the process of looping through each index and either leave them alone of flip the value between 0 and 1 based on the values of the neighbors. For this simulation we treat out of bound indexes as walls.
The first index of the array is the top left corner of the grid. This is relatively unique in the sense that this index only has three real neighbors. But as we mentioned before, out of bound (OOB) indexes will be treated as walls. If we count up each neighbor index,
plus the OOB indexes, we get a value of seven. Since this count is higher than four, we will flip this indexes value to one in the new array we are creating.
The second index of the array is a one. Now this index only has three OOB indexes that will count as walls.
This index only has one addition one in its neighbors, and if that's added to the three OOB index values, that puts our value to four. In our algorithm we are using today, the value that is required to change a one to a zero is if it has less than four walls as
neighbors. With that, we will leave this one in place and insert this value in the new array.
We will follow this process for each index with the given rules below:
If the original value is one in the starting index, to be set to zero in the new array, the neighbor values have to be less than four.
If the original value is zero in the starting index, to be set to one in the new array, the neighbor values need to be five or higher.
Let's speed this process along a bit.
Finishing the first row.
Generating the 2nd row.
Generating the 3rd row.
Generating the 4th row.
Generating the 5th row.
Generating the 6th row.
Generating the Final row.
Now we have a completed array of new values. The thing about the CA algorithm that is favorable is that you can reuse the algorithm again on the new set of values to generate deeper levels of generation on the initial data set.
Let's run the simulation on this new data and see how it turns out.
So you see how numbers start to collect together to create natural, organic looking regions of walls and floors. This is particularly handy technique for generating cave shapes for tilemaps.
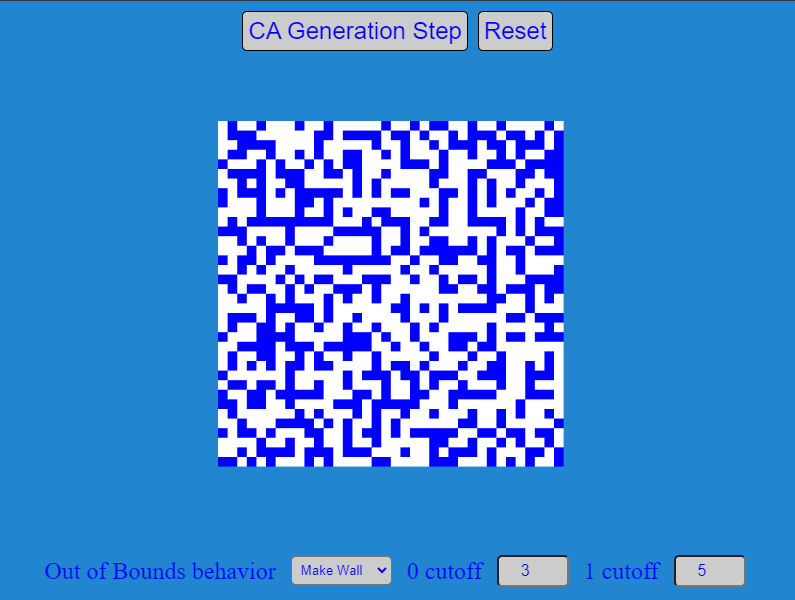
The demo simply consists of a 36x36 tilemap of blue and white tiles. Blue tiles represent the walls, and white tiles represent the
floor tiles. There are two buttons, one that resets the simulation, and the other button triggers the CA algorithm and uses the tilemap
to demonstrate the results.
Also added to the demo is access to some of the variables that manipulate the simulation. We can now modify the behavior of the OOB
indexes. For instance, instead of the default 'walls', you can now change the sim to use random setting, mirror the edge tile, or set
it constant to 'wall' or 'floor'.
You also have to ability to see what happens when you unbalance the trigger points. Above we defined 3 and 5 as the trigger points for
flipping a tile's state. You have the ability to modify that and see the results it has on the simulation.
The demo starts with a noise field which is a plugin for Excalibur. Using a numbered array representing the 36x36 tilemap, which has
ones and zeroes we can feed this array into the CA function. You can repeatedly press the 'CA Generation Step' button and the same
array can be re-fed into the algorithm to see the step by step iteration, and then can be reset to a new noise field again to start
over.
Why Excalibur
Small Plug...
ExcaliburJS is a friendly, TypeScript 2D game engine that can produce games for the web. It is free and
open source (FOSS), well documented, and has a growing, healthy community of gamedevs working with it and supporting each other. There
is a great discord channel for it HERE, for questions and inquiries. Check it out!!!
Conclusions
So, what did we cover? We discussed the history of Cellular Automata and some generalized use cases for CA within the context of game
development. We covered the implementation of the steps to take to perform the simulation on a grid of data, and then we conducted a
walk through example of using the algorithm. Finally, we introduced a demo application hosted on itch, and shared the repository in
case one is interested in the implementation of it.
This algorithm is one of the easier to implement, as the steps are not that complicated either in cognitive depth or in mathematical
processing. It is one of my favorite simple tools that reach for especially for tilemap generation when I create levels. I urge you to
give it a try and see what you can generate for yourself!





 and a dirt path tile